Wednesday, December 27, 2017

Best of 2017: Our Favorite Posts for Writers from the Last 12 Months

2018 is around the corner.

This could be the year you crack your first 1,000 subscribers. This could be the year you get published on that blog you’re dying to write for. This could even be the year one of your blog posts goes viral.

But none of that will happen unless you keep at it.

You not only have to keep writing, you also have to keep honing your craft.

Because the one thing that separates the winners from the losers in this blogging game is that the winners are always trying to improve.

They’re always trying to take their writing chops to the next level.

And they never stop trying. Because there’s always a new level to reach.

Here at Smart Blogger, we publish a ton of content to help you level up your writing, because we want you to become the best writer you can be.

But we’re not the only voice out there. The blogosphere is full of accomplished wordsmiths who have perfected their writing for years and now share their experience.

So today, we want to highlight a few posts that other bloggers published in 2017 — posts that will help you hone your craft and meet your writing goals in the year to come.

Check ’em out below:

We Analyzed 100 Million Headlines. Here’s What We Learned (New Research) – Buzzsumo

Author: Steve Rayson

You know the headline is the most important part of your article, right?

That’s why this is a must-read.

Buzzsumo has aggregated all the share counts of all the content that is published online. And in this post, they analyze that data to determine which headline phrases get the most social engagement, and which get the least.

Use this fascinating data in 2018 to give your headlines a better shot in the social arena.

The 7 Differences Between Professionals and Amateurs – Medium

Author: Jeff Goins

Jeff Goins is an iconic blogger who has five books and over 1,000 blog posts to his name. He’s a pro writer, but he had to start somewhere as well. He wasn’t always as effective as he is now.

In this post, he opens up about his past struggles to make it in the writing field, the mistakes he made along the way, and the mindsets that held him back.

The message is simple: If you want to be a pro, don’t act like an amateur.

Read this post and make sure that you’re not.

5 Writing Techniques that Stir Your Audience to Action – CopyBlogger

Author: Brian Clark

If you want to stir someone to action, you must first stir their emotions.

That is the premise of Brian Clark’s post, and he describes five writing techniques you can use to do so.

If you want your writing to stir your audience, practice these techniques.

Your writing will be more powerful and persuasive for it.

Sentence Structure: How to Make Your Sentences Easier to Read – Doris and Bertie

Author: Clare Lynch

This short post mirrors two sentences against each other. They both say the same thing in the same language, but one is easy to read, and the other is hard.

The difference?

Their structure.

Not enough bloggers review their writing on such a micro level. They don’t analyze their posts sentence by sentence. But this post shows that the way you structure a sentence can make a huge difference.

Give it a quick read because it could open your eyes.

The Anatomy of the PERFECT Article Intro (And How to Reverse Engineer It) – Unsettle

Author:  Sarah Peterson

In this epic post, Sarah goes deep on the art of writing compelling introductions — and make no mistake, this is a must-have skill for bloggers.

After all, your intros carry a lot of responsibility. They must not only convince people to start reading, but they must also convince people to keep reading.

Sarah breaks it down step by step to ensure the next intro you write has the desired effect. If you want people to read your article far enough to discover your brilliant ideas, read this post.

How I Wrote 200 Unique Blog Posts in 200 Days — A Formula for Infinite Creativity – Medium

Author: Barry Davret

Many people think being creative is all about coming up with original ideas. The truth is, creativity comes from knowing how to combine ideas and experience into something that feels fresh.

This author’s formula for creativity gave him 200 unique blog post ideas in as many days. It’s simple but effective.

That’s what earned him a spot on our list.

A List with 99 Strong Verbs to Make Your Content Pop, Fizz, and Sparkle – Enchanting Marketing

Author: Henneke Duistermaat

Henneke is an insanely talented writer with a knack for writing vivid content that jumps off the page.

In this post, she explains how you can create the same powerful effect by choosing strong verbs that paint a picture in your reader’s mind.

Her list of strong verbs is a good resource, but the advice that precedes it could change the way you write.

Hone Your Craft and Meet Your Blogging Goals in 2018

Don’t be one of those writers who hits a plateau and never takes the effort to improve.

You have to strive to become better. You have to try new techniques, and you have to practice until you’ve mastered them.

That’s what will equip you to make it in this blogging game.

The techniques from these posts are a good start. Practice them in 2018 to hone your writing, and when you look back in twelve months, you won’t believe how much you’ll have improved.

Have a happy new year!

Author bio: Robert van Tongeren is the Associate Editor of Smart Blogger, who helps our writers get their posts in tip-top shape. He also runs his own blog that helps guys dress a little sharper at Restart Your Style. You can find him on Twitter here.


from
https://smartblogger.com/best-2017-posts/

Thursday, December 14, 2017

Six Mistakes I’ve Made While Building my Blogging Business

Are you making mistakes when trying to build your blog?

Well – you are not alone.

In this episode, I give you insight into mistakes I’ve made while building my blogging business.

Listen to This Episode

Making Mistakes

failures on social media

Most people don’t write about their failures publicly.

Do you know what’s REALLY easy to do in this online world? Assume that the people we see online have everything together.

Most people don’t write about their failures publicly. We don’t generally go to Facebook to tell people how we messed up.

We post the things we want others to see, so that it paints a good picture of who we are.

I believe that this is natural.

Before the internet, we didn’t create photo albums showing themselves doing boring stuff. And we definitely didn’t create albums of our mistakes.

But this gets amplified with the internet.

As a result, it’s easy to look at others and think they never mess up.

But here’s the truth – we ALL make mistakes.

My Blogging Mistakes

I teach people how to build blogging businesses. But guess what – I’ve made Many mistakes on this blogging journey.

Here are six (of the many)…

1. Not Focusing on Building a Team

I didn't focus on building a team.

When I first started my online business in 2008, things got crazy. I spent so much time on my business that I hardly had any time for anything else.

It got so bad that I decided to quit.

Fortunately, after a break of a month or two, I decided to get back at it. At that point, I decided to get a Virtual Assistant.

This helped me tremendously and I’ve had at least one ever since.

As much as that helped, I never really took it to the next level – I never built a team.

As a result, I have not been able to accomplish as much as I would like.

2. Didn’t Put Enough Emphasis on Growing MY Business

I didn't put enough emphasis growing my business.

One of the areas I’ve had a considerable amount of success with over the last three years is with my one-on-one coaching.

In most of my coaching experiences, I’ve been able to help my clients grow their businesses SIGNIFICANTLY.

In some cases doubling, tripling, and even quadrupling the size of their businesses.

We were able to do this because we FOCUSED on growing their businesses.

But I gotta be honest, I haven’t focused on growing my business as much as I did theirs.

And while my business has experience a LOT of growth, it’s nowhere near where it should be based on the knowledge and experience I’ve had.

3. I Didn’t Take my Finances Seriously

I didn't take my finances seriously.

I HATE dealing with finances. It’s not something that excites me. In fact, money doesn’t excite me.

As a result, I’ve neglected my business finances in ways that I shouldn't.

I hate tax time because I ALWAYS end up spending a bunch of time trying to figure out what happened over the previous year.

And at the end, I’m always surprised by the crazy amount of money I have to give to uncle Sam.

4. I Jumped the Gun on Too Many Ideas

I Jumped the Gun on Too Many Ideas

I don’t know if you’ve noticed this, but I’m easily excited. It’s true.

As a result, I quickly jump the gun on too many ideas. This has happened multiple times in my business.

Some examples are:

  • When I decided to start an audio blog
  • When I decided to write a new post every day
  • When I decided to create a video every weekday

And yes – those are just a few of the ideas.

The problem is that when I jump the gun, I don’t usually come up with a sustainable plan to make it happen.

5. I Didn’t Follow Through on What Worked

I Didn’t Follow Through on What Worked

There are two things I’ve done to date that have been tremendously successful in growing my business.

Thing 1 – Creating resource centers

Thing 2 – Using Webinars to grow my Coaching club

Here’s what’s embarrassing. As great as they are, I have not done many of them. In fact, I created ONE resource center over two years ago that is responsible for a bulk of my income.

One would think that I would’ve created many of them since it has done so well for me. But nope. I haven’t.

And the same goes for webinars. If they work that well, I should be doing them regularly. Instead, I do them once in a blue moon.

6. I Haven’t Pushed Myself Hard Enough

I Haven’t Pushed Myself Hard Enough

Most of the progress in my business has been the result of external circumstances.

When I left my job, I NEEDED to hustle to get things done so that my family could eat – literally.

So that’s exactly what I did, and I got my business to the level that I needed it to be to take care of my family.

Then I stopped pushing.

The truth is – I’ve pushed mostly when things got challenging. But that push wasn’t internal.

Why I’m sharing these Mistakes

When you read a post like this, you probably expect the author to tell you how they overcame these issues.

The fact is, these are mistakes I continue to make. I have not “gotten over them”.

But here’s the thing – I’ve been able to have an impact in spite of these mistakes.

There are thousands of people all over the world who have gotten value from the content and resources I’ve created.

You don’t have to get everything right in order to have an impact.

What you HAVE TO do is take action.

Infographic

six big mistakes

Six Mistakes I’ve Made While Building my Blogging Business

The post Six Mistakes I’ve Made While Building my Blogging Business appeared first on Become A Blogger by Leslie Samuel.


from
https://www.becomeablogger.com/25717/six-mistakes-blogging-business/

Wednesday, December 13, 2017

How to Use Transitional Phrases to Keep Your Readers Sliding Down the Page

Some writers seem to have a magic touch…

One minute you’re reading their opening, and before you know it, you’ve reached the end of their article.

Their content reads so smoothly, it’s almost impossible to stop.

So how do they do it?

Well, great writers are meticulous about making each line flow seamlessly into the next. They understand how important it is for the reader to have a smooth reading experience, and they make sure to fix anything that would cause friction.

And one powerful way they do so is by using transitional phrases.

So today you’ll learn how to use them yourself. But first, let’s examine why they’re so important.

The Little Secret That Copywriters Have Known for Ages

Copywriters have known this for a long time:

The primary purpose of every paragraph you write is not to make a point, or to build your argument, or to convey valuable information. It’s to get your reader to read the next paragraph.

Famous copywriter Maxwell Ross likened this to a “bucket brigade.” Let me explain why…

In the days before fire trucks and pressure hoses, people would put out fires by forming a human chain. They would pass a bucket of water from one person to the next until the last person finally threw it onto the fire.

In those days, it was vital the chain remained unbroken. If the bucket wasn’t passed smoothly from one person to the next, the water would spill and not make it to the fire.

Likewise, each paragraph (and really, each sentence) you write must pass the reader on to the next. And just like in a real bucket brigade, the chain must be unbroken, or you will “spill” readers along the way, which means they won’t make it to the end of your article.

And that’s where transitional phrases come in.

How Transitional Phrases “Lubricate” Your Writing So Readers Slide from Line to Line 

Have you ever been with a group of friends and someone suddenly makes a random comment that doesn’t follow from anything that anyone else has said?

I bet you have — we all have.

It’s a strange moment — everyone (except the person who made the comment) just looks at each other, bewildered.

Well, writing without transitions is like that.

It causes friction in your reader’s mind and leaves them scratching their head, wondering “How do you get from this to that?”

Any piece of writing is a series of ideas, propositions, and arguments placed one after the other.

But those ideas need to be linked to each other. You need transitional words and phrases to help readers understand how ideas relate to each other. Without them, readers will feel like you’re switching from idea to idea too abruptly, and in most cases, you’ll leave them feeling confused.

Want to know how to do it right? Take, for example, this excerpt from Jon Morrow’s post How to Make Money Blogging: How This Blog Makes $100K per Month:

Even if you’re making fantastic money from affiliate marketing or selling services, chances are you’ll want to try your hand at developing your own product at some point. So, where should you start?

My answer: with blogs, the most profitable price is usually the end of the funnel. Here’s what I mean…

You’ve seen a sales funnel, right? A company entices you with a freebie, then they offer you something cheap but irresistible, and then they gradually sweet talk you into buying more and more expensive stuff. It’s a tried and true marketing tactic, and you should absolutely build a sales funnel for your blog.

What you might not know is you should build it in reverse.

A lot of bloggers launch a cheap e-book as their first product, and then they get frustrated when they don’t make much money. Here’s why: the real profit is at the end of the funnel, not the beginning.

 
You might note that these phrases don’t convey any information. All they do is make the ride smoother. All they do is connect one idea to another.

The good news is, you probably already use transitional phrases in your writing to some extent. Most people use them naturally. However…

There’s a special class of transitional phrases that many bloggers don’t even know about.

13 Exceptionally Engaging Transitions That Readers Can’t Resist 

Remember Maxwell Ross, the “bucket brigade” guy?

He had a list of transitional phrases that don’t just help readers transition from one idea to the other, but actively work to keep those readers engaged.

These phrases keep readers glued to the page by either evoking their curiosity or by hinting that something important is about to come.

They give a jolt to readers’ brains, waking them up and demanding they pay attention.

Make no mistake; these phrases are powerful. Backlinko’s Brian Dean credits them for readers staying on his pages for an average of four minutes (which is a lot). Brian uses these transitional phrases in all of his articles (as you can see in the screenshots below).

So let’s dive in.

#1: The “Mind Reader” Transition


How it works: You claim to know what the reader is thinking, or you assume the reader agrees with something you’re about to say. The reader will then want to find out if you’re right.

Examples:

  1. I know what you’re thinking…
  2. And now, you’re thinking…
  3. I can almost hear you thinking…
  4. You guessed it…
  5. I’m sure you’re with me on this one…
  6. Here’s something we can both agree on…
  7. I think you’ll agree with me when I say…
  8. You must be wondering…
The "Mind Reader" Transition

#2. The “Can’t Miss This” Transition


How it works: You literally tell the reader you’re about to share an important piece of information. Nobody wants to miss anything important, which is why this simple phrase will pique your reader’s attention.

Examples:

  1. Now, this is important…
  2. Here’s the interesting part…
  3. Here’s the bottom line…
  4. Here’s why that’s important…
  5. So what’s my point?
  6. And the best part is…
  7. You don’t want to miss this next part…
  8. It all boils down to this…
The “Can’t Miss This” Transition

#3: The “Important Insight” Transition


How it works: You hint you’re about to share an important insight or discovery. Your reader will be curious to find out what it is.

Examples:

  1. That’s when I realized…
  2. And then it hit me…
  3. Here’s what we found instead…
  4. I finally understood that…
  5. Then it finally dawned on me…
  6. But guess what I realized just in the nick of time…
  7. You won’t believe what we discovered…
The “Important Insight” Transition

#4: The “There’s a Catch” Transition


How it works: You hint at a problem or obstacle that might keep the reader from reaching their desired goal. The reader will want to know what the problem is (and they’ll assume you’ll also provide the solution).

Examples:

  1. But there’s a catch…
  2. So what’s the catch?
  3. There’s just one problem…
  4. The problem is…
  5. Here’s the main issue with that…
  6. And this is where people run into trouble…
  7. That’s when you might hit a snag…
The “There’s a Catch” Transition

#5: The “Big Answer” Transition


How it works: As I said, after you identify a problem, you have to offer a solution. That’s where this transition comes in. When you’ve just told readers about a problem they’ll be facing, they’ll want to know how to solve it.

Examples:

  1. So what’s the solution?
  2. Fortunately, there’s a simple solution…
  3. The solution is simple…
  4. Here’s the big secret…
  5. The answer?
  6. The trick is to…
  7. Here’s how you solve this…
The “Big Answer” Transition

#6: The “But Wait, There’s More” Transition


How it works: You use this transition when your strategy or product has two (or more) big benefits. Typically, you’d start with the most important benefit first, and then use this phrase to transition into the additional benefits.

Examples:

  1. But wait, there’s more…
  2. But that’s not all…
  3. It gets better…
  4. And I’m not stopping there…
  5. As if that’s not enough…
  6. And on top of that…
The “But Wait, There’s More” Transition

#7: The “Exemplary Example” Transition


How it works: You introduce an example (obviously). Readers tend to pay attention to examples because they help contextualize the theory they’ve just learned.

Examples:

  1. For example…
  2. Take Billy’s story, for example…
  3. Here’s a little case study of this strategy in action…
  4. Case in point…
  5. Just look at what happened to…
The “Exemplary Example” Transition

#8: The “Lifting the Veil” Transition


How it works: You hint at a clarification or supplementation of the preceding text. Readers will pay attention because they realize it will help them understand the information better.

Examples:

  1. I’ll explain…
  2. Let me elaborate…
  3. Let me walk you through…
  4. Let me lift the veil for you…
  5. Let me break this down for you…
  6. Here’s what I mean…
  7. Let me clarify…
The “Lifting the Veil” Transition

#9: The “How To” Transition


How it works: You transition from the theoretical to the practical. You introduce the steps the reader must take to get the promised result. This is the reason most of them are reading your article in the first place, so it will make them sit up.

Examples:

  1. Here’s how to do it yourself…
  2. Here’s how you can do the same thing…
  3. How?
  4. Here’s how…
  5. You’re about to find out how…
  6. But how do you… ?
  7. Let me tell you how…
The “How To” Transition

#10: The “Stay with Me” Transition


How it works: You command the reader to stay on the page. Use this phrase whenever the reader might have doubts about a bold or shocking claim, or after you’ve doled out some complicated information. Most readers will feel compelled to comply.

Examples:

  1. Stay with me now…
  2. Stick with me here, because…
  3. Keep reading…
  4. Don’t stop reading now…
  5. I know that’s a lot to take in, but bear with me…
The “Stay with Me” Transition

#11: The “Curious Question” Transition


How it works: Questions engage the reader’s brain and make them feel like they’re part of a conversation (rather than being lectured). And of course, whenever you pose a question, the reader will want to know the answer, which means they have to keep reading.

Examples:

  1. But what does that mean?
  2. But what exactly is…?
  3. Why is that?
  4. Why does this work?
  5. How do I know?
  6. Is it true?
  7. But what if… ?
  8. But where can you find… ?
  9. So when do you use… ?
The “Curious Question” Transition

#12: The “Rhetorical Question” Transition


How it works: Rhetorical questions engage the reader’s brain in the same way as curious questions. The only difference is that curious questions hint at an upcoming answer, whereas rhetorical questions assume the answer. This will prime the reader to agree with you.

Examples:

  1. You see my point, right?
  2. Do you see how huge this is?
  3. Don’t you wish… ?
  4. Is that something you’d like for your business?
  5. How awesome is that?
  6. Do you ever wonder… ?
  7. Sound good?
  8. Amazing, isn’t it?
The “Rhetorical Question” Transition

#13: The “Guess What Happened” Transition


How it works: You hint at the conclusion of the events or the result of the activities you’ve covered. Readers understand that this is one of the most crucial parts of your article or story, so they pay attention.

Examples:

  1. Guess what happened?
  2. Here’s what happened next…
  3. Even I was surprised at what happened next…
  4. You won’t believe how the story ends…
  5. These were our results…
  6. The result?
The “Guess What Happened” Transition

Master Your Transitions and Watch Reader Engagement Shoot Up

When you master the art of transitioning, you’ll notice that readers will stay on your posts longer. You’ll notice more of them will read your posts to the end.

Don’t get me wrong; these phrases aren’t magic. They won’t turn a bad article into a good one.

But they can help turn a good article into a great one.

You still have to write content that’s, you know, of interest to your audience. But if you do, these phrases can help keep your readers glued to the page. One minute they’ll be reading your opening lines, and before they know it, they’ll have reached the end of your article.

So sprinkle transitional phrases throughout your content, and one day, you’ll check your analytics and notice people are spending a lot more time on your posts.

That’s when you know they’re doing their job.

Sounds pretty good, right?

About the Author: Rob Powell shows beginning bloggers how to write blog posts that engage your readers and keep them on the page. Download his list of 517 Transitional Words and Phrases and literally pull your readers down the page.


from
https://smartblogger.com/transitional-phrases/

Tuesday, December 12, 2017

Six Mistakes I’ve Made While Building my Blogging Business

Are you making mistakes when trying to build your blog?

Well – you are not alone.

In this episode, I give you insight into mistakes I’ve made while building my blogging business.

Making Mistakes

Do you know what’s REALLY easy to do in this online world? Assume that the people we see online have everything together.

Most people don’t write about their failures publicly. We don’t generally go to Facebook to tell people how we messed up.

We post the things we want others to see, so that it paints a good picture of who we are.

I believe that this is natural.

Before the internet, we didn’t create photo albums showing themselves doing boring stuff. And we definitely didn’t create albums of our mistakes.

But this gets amplified with the internet.

As a result, it’s easy to look at others and think they never mess up.

But here’s the truth – we ALL make mistakes.

My Blogging Mistakes

I teach people how to build blogging businesses. But guess what – I’ve made Many mistakes on this blogging journey.

Here are six (of the many)…

1. Not Focusing on Building a Team

When I first started my online business in 2008, things got crazy. I spent so much time on my business that I hardly had any time for anything else.

It got so bad that I decided to quit.

Fortunately, after a break of a month or two, I decided to get back at it. At that point, I decided to get a Virtual Assistant.

This helped me tremendously and I’ve had at least one ever since.

As much as that helped, I never really took it to the next level – I never built a team.

As a result, I have not been able to accomplish as much as I would like.

2. Didn’t Put Enough Emphasis on Growing MY Business

One of the areas I’ve had a considerable amount of success with over the last three years is with my one-on-one coaching.

In most of my coaching experiences, I’ve been able to help my clients grow their businesses SIGNIFICANTLY.

In some cases doubling, tripling, and even quadrupling the size of their businesses.

We were able to do this because we FOCUSED on growing their businesses.

But I gotta be honest, I haven’t focused on growing my business as much as I did theirs.

And while my business has experience a LOT of growth, it’s nowhere near where it should be based on the knowledge and experience I’ve had.

3. I Didn’t Take my Finances Seriously

I HATE dealing with finances. It’s not something that excites me. In fact, money doesn’t excite me.

As a result, I’ve neglected my business finances in ways that I shouldn't.

I hate tax time because I ALWAYS end up spending a bunch of time trying to figure out what happened over the previous year.

And at the end, I’m always surprised by the crazy amount of money I have to give to uncle Sam.

4. I Jumped the Gun on Too Many Ideas

I don’t know if you’ve noticed this, but I’m easily excited. It’s true.

As a result, I quickly jump the gun on too many ideas. This has happened multiple times in my business.

Some examples are:

  • When I decided to start an audio blog
  • When I decided to write a new post every day
  • When I decided to create a video every weekday

And yes – those are just a few of the ideas.

The problem is that when I jump the gun, I don’t usually come up with a sustainable plan to make it happen.

5. I Didn’t Follow Through on What Worked

There are two things I’ve done to date that have been tremendously successful in growing my business.

Thing 1 – Creating resource centers

Thing 2 – Using Webinars to grow my Coaching club

Here’s what’s embarrassing. As great as they are, I have not done many of them. In fact, I created ONE resource center over two years ago that is responsible for a bulk of my income.

One would think that I would’ve created many of them since it has done so well for me. But nope. I haven’t.

And the same goes for webinars. If they work that well, I should be doing them regularly. Instead, I do them once in a blue moon.

6. I Haven’t Pushed Myself Hard Enough

Most of the progress in my business have been the result of external circumstances.

When I left my job, I NEEDED to hustle to get things done so that my family could eat – literally.

So that’s exactly what I did, and I got my business to the level that I needed it to be to take care of my family.

Then I stopped pushing.

The truth is – I’ve pushed mostly when things got challenging. But that push wasn’t internal.

Why I’m sharing these Mistakes

When you read a post like this, you probably expect the author to tell you how they overcame these issues.

The fact is, these are mistakes I continue to make. I have not “gotten over them”.

But here’s the thing – I’ve been able to have an impact in spite of these mistakes.

There are thousands of people all over the world who have gotten value from the content and resources I’ve created.

You don’t have to get everything right in order to have an impact.

What you HAVE TO do is take action.

The post Six Mistakes I’ve Made While Building my Blogging Business appeared first on Become A Blogger by Noemi M.


from
https://www.becomeablogger.com/25715/six-big-mistakes/

Wednesday, December 6, 2017

How to Make More Money with Your Blog in 2018

Do you want to make more money with your blog in 2018? I know, silly question.

We all want to make more money with our blogs.

Well, in today’s episode, I share some practical tips you can use to do just that.

Listen to This Episode

The Pareto Principle

Pareto Principle

Pareto Principle

When I started blogging back in 2008, I learned about the 80/20 principle, a.k.a. The Pareto Principle.

It’s a very simple concept that states that 80% of our productivity comes from about 20% of our effort.

When it comes to blogging, that generally says that 80% of my results come from 20% of what I actually do.

Here’s the good news – if I can figure out what that 20% is and focus on those things, I will have a bigger impact.

As you think about 2018, I want you to think about what that 20% is for you. First, let's start with content.

Do a Content Analysis

The content you create is the fuel of your blog. But the fact is that not all content are created equally.

Some of your content will do very well and others won’t.

How do you determine what works and what doesn’t? By looking at what has and hasn’t worked in the past and by asking your audience.

Here are 4 ways to do that…

In Google Analytics:

Check most performing content in Google Analytics

Use Google analytics to see which content performed well (go to Behavior > Site Content > All Pages).

Set the time range to all of 2017.

This will tell you what blog posts received the most visits.

In Google Search Console:

Use the Google Search Console to see what search queries resulted in the most visits to your blog (go to Search Traffic > Search Analytics).

Make sure to select Clicks, Impressions, CTR and Position.

Set the time range to the last 90 days (that’s the maximum you can do).

This will give you a very detailed report of how people are finding you in Google.

On Buzzsumo (optional):

Optional tool for checking which content gets the most shares on Social Media.

Buzzsumo is a great (but expensive) tool for checking to see which of your content has been shared the most on social media.

There are ways to drill this down in Google Analytics, but it’s a bit complicated. Buzzsumo makes it easy.

Fortunately, you can see your top five pieces of content without signing up. That gives you some decent info for free.

If you wanted more, you can also check their 14 day free trial.

Conduct a Survey:

Conduct a survey.

One of the best ways to know what your audience wants is to ask them.

If you already have an audience, send out a survey and see exactly what they are struggling with.

This will give you ideas for content you can create to provide them with more value.

External Analysis:

What if you don’t have an audience. Is there any hope for you? Of course there is.

If you understand who you’re targeting, you can find out what content they are looking for.

Visit other blogs in your niche and see what content is working for them. Or visit Facebook groups and see what questions people are asking.

Take Action on Content

Now that you know what content performs well for your audience, it’s time to take action on that data.

Optimize your top-performing content

Optimize your top performing content.

It’s already performing well, so lets milk it for what it’s worth. Here’s how you would do that:

  • Revise and expand: Do an analysis of your top content. Is it thorough? Are there ways to provide even more value? If so, revise and expand on that content.
  • Include a call to action: Is there a next logical step for the reader to take? Why not include a call-to-action for them to get a free resource by joining your list?
  • Promote affiliate product: Is there a product or service that’s highly relevant to that post that you can promote as an affiliate? If so, make it happen.
  • Promote your own product/service: They’ve already consumed your content and hopefully love it. If you have a product or service to offer, let them know about it. Don’t hold back all that value.

Create more of that kind of content

This one’s a no-brainer. If that kind of content is performing well, create more of it.

It’s tested and proven. By doing more of the same, you’re creating content that you know works.

This will bring more people to your blog and give you more opportunities to promote what you have to offer.

Do a Better Job at Selling

Now that we’ve spoken about the content, let’s talk about selling. To make more money in 2018, you will have to sell more (and/or raise your prices).

Here are some ways to do that:

Double down on what worked in the past

Have you tried something in the past that worked very well? If so – do MORE of that.

It’s so easy to move on and try something else before fully taking advantage of what actually worked for us. Avoid that urge.

Do less of what hasn’t worked in the past

If you’ve tried something that didn’t work, don’t focus on trying to make that process better. Instead, focus that energy on what you know works. Remember the 80-20 principle.

Optimize your sales page

Do you have a sales page for your product/service? If not, create one.

If you do, is it converting? If it isn’t, then revise it.

A great framework for doing that is the P.A.S.T.O.R. framework by my friend Ray Edwards.

Raise your Prices

Raise your prices.

Did that make you nervous? When I’ve suggested this to my coaching clients, they usually get nervous.

Can you guess what makes them feel better about it? Seeing more money come in, lol.

Raising your prices can be a great way to increase your revenue. Try it out and see how it works for you.

Create Funnels

Create Funnels

Create Funnels

Having a product or service to sell can be a great thing. Selling it is better. Selling it on autopilot is even better.

Create a lead magnet that solves a specific problem. Then have an autoresponder sequence that provides even more value and leads to the sale.

Create Resource Centers

The most successful affiliate campaign I’ve ever run on this blog is for promoting GetResponse.

Why was it so effective? Because I created an entire GetResponse Resource Center.

This resource center provides all kinds of training to help someone use GetResponse. But it also includes my affiliate link.

Resource centers are great for selling without being pushy.

Get more eyes on your content

We’ve looked at creating the right kind of content. We’ve also looked at creating a better sales process.

There’s one thing missing – you have to get more people to actually see that great content. How do you do that?

To be honest, I can create an entire blog series on the topic. There are so many things you can do. Here are a few basic tips:

Connect with the right people

Connect with the right people.

One of the best ways to get traffic to your blog is by getting it from people who already have an audience.

This is why it’s important for you to connect with other people in your niche. Reach out to them online and provide value to them.

Or attend events in your niche to connect with them in person. Those relationships can go a long way to getting you in front of the right audience.

Go live

Go Live!

Go Live!

I know I know – Everyone’s talking about live video. Why? Because it actually works (if you do it right).

Go live more often and do it consistently. This can help you grow your audience over time.

Join the conversation

Join the conversation. Connect with the right people.

There are conversations happening every day in your industry. Look for trending topics and cover them from a unique perspective.

The more you do that, the more you will show up as someone who’s relevant in your niche.

Let’s wrap this up baby

There you have it – my tips for making more money with your blog in 2018.

I know it’s a lot of stuff. The good news is that you don’t have to do it all at once. In fact, you can literally choose one main thing to focus on for all of 2018 and it can make the world of difference.

The important thing is this – TAKE ACTION.

So my question for you is – what will you be taking action on to help you make more money in 2018? Let me know in the comments below.

Resources Mentioned

  • Buzzsumo – a great (but expensive) tool for checking to see which of your content has been shared the most on social media.
  • The P.A.S.T.O.R. framework by Ray Edwards – a great framework for revising and optimizing your sales page.

Infographic

The post How to Make More Money with Your Blog in 2018 appeared first on Become A Blogger by Leslie Samuel.


from
https://www.becomeablogger.com/25647/make-more-money-blog-2018/

Thursday, November 30, 2017

How to Write a Bio that Convinces Readers You’re Their Personal Superhero

Writing a bio is hard.

You have to knock ’em dead with two or three dazzling sentences that show you’re a likable, credible, and accomplished expert.

When readers read your bio, they must believe you’re the answer to their prayers — the superhero they’ve been waiting for, that will swoop in and solve that big problem they’ve been dealing with.

But your bio makes you sound more like a superdweeb than a superhero, and every time you land a guest post, only a trickle of readers ends up on your site.

“What about my brilliant post?” you want to yell at your computer. “Wasn’t that enough?”

No, it wasn’t, and that’s the point.

By the time people get to your bio they’ve read your post to the end (high five for that!). You’ve earned their attention. But unless you can convince them you have more to offer them, they’re gone.

So you need to make every word count.  

Luckily, I can show you a simple three-step process to do exactly that. But first, let’s look at some common bio blunders and how to avoid them.

The 6 Common Bio Blunders That Make You Look Like an Amateur (And What to Do Instead)

#1: Making It All About You


I’m Jill — a free-spirit with a passion for quilting, bird watching, Tai Chi, and calligraphy.”
 
Thanks for sharing, Jill. But do I really care? Nah.

It’s confusing, I know. “Bio” is short for biography, which suggests it should be all about you.  But the main purpose of your author bio is to show your audience how you can help them solve their problem with the skills you bring to the table.

So, it’s not about you, Jill. It’s about them.

What to Do Instead:

In this post, using almost the same amount of words, Ayodeji gives us just enough information about himself to tell us what he does and how he helps his audience.

Ayodeji is a writing coach who helps aspiring writers develop the confidence and habits they need to make an impact and income. Visit his page to get three free writing guides, plus a copy of his bestselling Amazon book.
 
It’s clear, precise, and focused on the outcome, not on Ayodeji. He uses phrases like “develop the confidence and habits,” and “make an impact and income,” which directly target the deep-rooted desires of aspiring writers.  He speaks their language.

Here’s another tip: It’s usually best to write your bio in the third person, as Ayodeji has. It’s more professional.

#2: Writing a Condensed Resume, or a Laundry List of Accomplishments


John Brown is a qualified personal trainer with a sports medicine degree from Fremont College, as well as professional certifications from the American College of Sports Medicine and the National Strength and Conditioning Association.
 
Your bio is not a dumping ground for your career path and qualifications. It’s a tiny elevator pitch that’s selling you as a credible solver of your reader’s problems.

So don’t list every degree you have or talk about your first job out of school. Readers don’t really care. They only care whether or not you have the solutions they are looking for.

What to Do Instead:

Your bio should only include details about yourself that directly relate to your audience’s problem.

Think about your career, education, and skills, and then carefully select the most pertinent facts that are going to impress the audience you are writing for. Like this:

Jessi Rita Hoffman is a book editor who helps authors get their books out of their heads and into print. A former publishing house editor-in-chief, she has edited books for Donald Trump and bestselling/award-winning authors. Visit her blog for writers here.
 
Jessi tells us the most important thing about herself (that she is a book editor), and what she can do for her audience (get their books into print), while establishing her credibility (“best-selling,” “editor-in-chief”).

Everything she mentions is designed to appeal to the audience she’s trying to reach.

#3: Sharing Irrelevant Details or Stuff You Think Your Audience Should Care About


Joe Brown is a content marketer with a passion for snowboarding. When he’s not at his computer, you can find him at his nearest half-pipe, or maybe on Twitter @joeb, where he likes to tweet about his pet python. Alternatively, try his email at joe@xyz.com, and he’ll probably shoot you back a list of his favorite origami folds.
 
This bio is from someone whose expertise is content marketing, although he hides it well.

Much like your degrees and career path, your audience doesn’t care about your hobbies, passions, and personal philosophies either, unless they directly impact the problem they’re trying to solve.

What to Do Instead:

As mentioned earlier, only share the details that your audience will find relevant.

If you’re mad keen on knitting and you’re writing for an arts and crafts blog, then go ahead and mention your passion. It’s relevant. But don’t tell them about your cat, unless Fluffy can knit too.

#4: Trying to Cram Too Much In


Okay, so you’ve managed to include only relevant details about yourself, so you’re safe. Right?

Not if you included too many of them.

Like this one from Jo. She’s had an impressive career, but her bio feels endless:

Jo Smith is a personal finance blogger with 20 years of experience in accounting, international banking, and financial planning. She started as a trainee bank teller in Little Rock, Arkansas, before completing her accounting degree and climbing the corporate ladder at Citibank. More recently, Jo decided to follow her dreams and leave the safety net of her six-figure salary to start her own coaching business. Jo is on a mission to help everyday families and couples stop dreaming and start living the life they’ve always wanted through sustainable wealth building, and planning for their future financial security.
 
This is way too much information.

Writing your own bio can be hard. Sometimes you’re too close to the subject matter to realize what’s important and what can be left out. But your bio isn’t the place to share your entire life story. You need to be picky.

What to Do Instead:

With some careful pruning, the real gems hidden away in Jo’s bio can be given center stage:

Jo Smith is a personal finance blogger and coach with 20 years of experience in the high-powered world of international banking and accountancy. Jo is on a mission to help everyday families build sustainable wealth, stop stressing about their financial security, and start living the life they’ve always wanted.
 
Go through your bio word by word and ask yourself, “Does this bit of information make any difference to my audience?”

If the answer is no, take it out, and limit your bio to two or three sentences.

#5: Being Overly Formal (a.k.a. Boring)


Joe Jones is an accomplished marketing consultant who specializes in the field of physician practices. He works with medical centers and practitioners to maximize their online real estate, garner new market segments, and engender business growth.
 
If you’re anything like me, you had to read this bio more than once to get a sense of what Joe does. It’s way too formal. Most people will just glaze over this.

What to Do Instead:

Instead of using stilted words and phrases like “maximize their online real estate” and “engender business growth” Joe missed a great opportunity to make himself stand out from the crowd by creating a point of interest.

Perhaps he could have started with something like:

“Joe Jones is an expert marketer who can take your medical practice from queasy to fighting fit…”
 
Do you see how that might grab a few more eyeballs, cut through the noise, and make an impact with his target audience of doctors?

#6. Being Vague (or Overly Woo-Woo)


Cecile is a life coach and devoted mom. She loves day breaks and giving things a go. She is passionate about her fellow humans and wants to be their inspiration for growth, as they find their way through the dark to their true self.
 
Hands up, whoever doesn’t have a clue what this person is talking about. What does she do? How does she help solve my problem? Why should I be interested in her?

You need to avoid ambiguous phrases like “inspiration for growth” and “find their way through the dark.” These phrases might have a nice ring to them, but they mean very little to your reader. They’re too open to interpretation.

What to Do Instead:

You don’t have time to beat around the bush in your bio. Get straight to the point. Like this:

Cecile is a qualified self-development coach who is passionate about helping professional women develop the skills and self-assurance they need to take control of their working lives. Download her free guide, How to Quit Your Dead-End Job Without Risking Your Income, and open the door to your dream career today.
 
In two sentences, Cecile tells me everything I need to know about what she does and how she can help me. No fluff, no messing about, and a juicy opt-in bribe to seal the deal.

Click on the image below to see a larger view:

Embed This Infographic On Your Site

The 6 Common Bio Blunders That Make You Look Like an Amateur (And What to Do Instead) from SmartBlogger.com

The 3-Step Process to Writing a Click-Worthy Author Bio

So now you can see where you might’ve gone wrong in the past, and you’re dying to write a new version. But how do you ensure your next bio won’t commit the same blunders?

Easy. Just follow this simple three-step process to write a bio that your ideal readers can’t resist clicking.

Step #1: Introduce Yourself with a Bang


This is where you tell the audience who you are and what makes you different (while avoiding the common blunders we’ve just discussed). You need to spark their interest and curiosity and get them to say, “Tell me more.”

Let’s start with this example from a blogger in the personal development niche.

Sue Smith is a self-help writer and coach with a degree in psychology…
 
This tells me what Sue does, but it’s rather dull and same-y in a sea full of personal development blogs. There’s nothing here to set her apart or pique our interest.

Let’s give it a twist:

Self-help writer, Sue Smith, is part social scientist, part agony aunt, who…
 
That sounds a bit more interesting. Sue manages to appeal to her audience on different levels by sounding educated, professional, and personable at the same time. Describing herself as an “agony aunt” downplays the more clinical “social scientist.”

I’m curious to know more, and it certainly makes her distinctive.

But there’s another angle Sue could take:

Sue Smith is a certified psychologist who specializes in beating social anxiety.
 
Now, this one is more similar to the first example, but the difference is that it adds more credibility — “certified psychologist” sounds much more credible than “has a degree in,” which suggests she’s fresh out of college — but it also sets her apart more.

She has a specialty, which gives her ideas on the topic more weight than others. If you suffer from social anxiety, you’d want to listen to the expert on it, right?

Compare also:

Sue Smith’s books on beating social anxiety have won her international acclaim. She has been featured as an expert on Psychology Today, The Oprah Winfrey Show, and Good Morning America.
 
This version goes even further in establishing Sue’s credibility. Not only has she published multiple books on the topic of social anxiety, but she’s even been featured on some well-known media channels, adding social proof to her expertise.

We’ve talked before about not delivering a laundry list of accomplishments, but if you have specific accomplishments that make you stand out, those are worth including.

Here’s an excellent bio example that both offers a point of interest and adds credibility:

Jessica’s outside-the-box approach to business plan writing has helped her clients collectively raise almost $50 million in financing to start and grow new businesses. Sign up for her 5-part business plan training series for FREE here so you can get your business plan done and get your money sooner.
 
Jessica doesn’t just say she’ll help you write a business plan, she mentions she has an “outside-the-box approach,” which immediately makes you curious what that approach is. Then she steps it up even more by mentioning her approach has collectively raised $50 million in financing. That’s nothing to sneeze at and creates instant credibility.

It’s an excellent bio that will absolutely pique her audience’s interest.

Step #2:  Call Out Your Audience and Say How You Help Them


Remember, this isn’t about you, it’s about what you can do for your audience. So you need to define who they are and what problem of theirs (their key fear or desire) you can solve.

You should aim for both a logical and emotional connection.  It’s tough, but do-able.

Let’s take Kim, a blogger in the parenting niche:

Kim’s passion in writing is to inspire other parents to not just “hang in there” or “make it through” but to thrive. She does this through blogging at kimbiasottotoday.wordpress.com and speaking.
 
By using language most parents will relate to and zeroing in on their fears, Kim makes a strong emotional connection. At the same time, there’s no mistaking the practical (logical) solution Kim offers.

Note: Of course, Kim’s bio would be even further improved if she linked to an incentive rather than her homepage. More on that in the next step!

Here’s another example:

Jessica Blanchard, registered dietitian and Ayurvedic practitioner, helps busy people re-energize with super simple food, yoga, and wellness strategies that work. Grab your free 7-Day Plan and learn to eat, move, and live better in ten minutes a day.
 
Jessica clarifies immediately who she helps (busy people) and how she helps them (by re-energizing them through food, yoga, and wellness strategies).

You must be absolutely clear about this. If readers can’t identify themselves in your bio and see you have the solution they’re looking for, they will move on.

Step 3:  Offer an Irresistible Reason to Click


You’ve told your audience who you are, what you do, and how you can help them. You’ve impressed them with your credentials and sparked their curiosity.

They’re ready to move to second base, but they need that last push. An irresistible reason to click through to your site and sign up. You need to offer an incentive.

Take a look at this bio:

Henneke Duistermaat is an irreverent copywriter and business writing coach. She’s on a mission to stamp out gobbledygook and to make boring business blogs sparkle. Get her free 16-Part Snackable Writing Course For Busy People and learn how to enchant your readers and win more business.
 
Boom! In 46 carefully curated words, Henneke tells us who she is, what she does, how she can help, and then gives us a gold-plated reason for parting with our email address.

Her free report is 16 parts, but it’s “snackable,” which makes it sound very easy to digest. And it’s for “busy people”, which shows that Henneke understands her audience. She promises results and cleverly relates this back to her own blog, Enchanting Marketing.

Unfortunately, we can’t all steal Henneke’s bio, but we can use it as a fine example of how to write our own.

Ready to Write Your Best Bio Ever?

This three-step process is simple, but it’s not easy, so give your bio the time it requires. You should brainstorm several options for each of the steps.

Bios are hard to craft, but they are also one of the most effective pieces of marketing you can create when you get it right.

Write your best bio ever and your audience will be intrigued. They’ll want to know more and they won’t be able to resist your free offer.

They’ll see you as a credible, personable problem-solver. Their problem-solver.

And they’ll click through to your site, ready and willing to hand over their email address to their new blogging superhero.

You.

About the Author: Mel Wicks is a seasoned copywriter and marketing strategist who helps bloggers and entrepreneurs put the “OMG! Where do I sign up?” into everything they write. Download her exclusive Fill-in-the-Gaps Cheat Sheet for an Instant Click-Worthy Author Bio.
 

from
https://smartblogger.com/how-to-write-a-bio/

Thursday, November 16, 2017

6 Best WordPress Backup Plugins Compared (100% Objective)

Imagine if one day your blog just disappeared.

It’s a terrifying thought, right?

You put all that work into writing amazing content and developing an audience. The last thing you want is for it all to go up in a puff of smoke because of some technical issue or hacker.

But if you don’t back up your website regularly, that’s exactly what would happen if something ever went wrong.

Thankfully, I have some good news for you:

Backing up your website isn’t something you need a developer for. Heck, it’s not even that complicated.

And with the right WordPress backup plugin, you’ll be able to sleep easy knowing that no matter what happens to your site, you can always have it up and running again in no time.

To help you get started on the right foot with WordPress backups, I’m going to spend this post going through six WordPress backup plugins and helping you choose the one that’s right for you.

But first…

Here’s What to Look For in a WordPress Backup Plugin

While the backup plugin that you eventually choose will depend on your personal preferences, there are a few key features you should at least consider when making your choice:

  • Does the plugin offer automation? Automated backups let you “set it and forget it.” In other words, it keeps you from having to remember to do it manually every week/month/whatever time frame.
  • Does the plugin take full or partial backups? All the plugins on this list offer full site backups. But if you search elsewhere, you will find some plugins that will only back up specific parts of your websites, like just your database or theme.
  • How does the plugin handle restoring from backups? Some plugins give you built-in tools, while others require you to manually upload the files and import your database.
  • Does the plugin work with remote storage? If the plugin doesn’t let you back up to remote storage, you’ll be entirely responsible for keeping your backup files safe. Some plugins will store your backups on your server, which can still be useful, but won’t help you if your server gets wiped clean.
  • Does the plugin offer site migrations? This is the least important question. But if you think you’ll move your site often — like from a local staging site (that you use for tests) to your live site — this feature comes in handy.

The 6 Best Backup Plugins Compared in Detail

In order to help you make your decision, I want to give you an actual idea how these plugins function in the real world. So, in addition to giving you each plugin’s feature list, I’ll also show you the actual process for how you can use the plugin to back up and restore your website.

Let’s dive in…

#1: UpdraftPlus


By the numbers, UpdraftPlus is the most popular backup plugin at WordPress.org. It also has a staggering five-star rating on over 2,672 reviews to help explain its popularity.

So, why do so many people like UpdraftPlus? Probably because it gives you nearly all of the points I discussed above without charging a penny (though there is a premium version with more features).

Here’s what you get with UpdraftPlus:

  • Manual or automatic backups (based on a schedule that you define)
  • Full-site backups or backups of specific parts of your site (like your database)
  • Easy restore from backup via a dedicated tool
  • Off-site backup to Dropbox, Google Drive, Amazon S3, and more
  • UpdraftVault dedicated backup storage, which is basically a dedicated cloud storage service for UpdraftPlus (storage costs extra, though)

In fact, the only feature that you might miss in the free version is a dedicated site migration tool. If you do want that migration feature, though, you can always purchase UpdraftPlus premium starting at $70.

UpdraftPlus table

Who Is UpdraftPlus Good For?

UpdraftPlus is the plugin I recommend for most casual bloggers because it strikes a good balance between flexibility/features and ease of use.

But while it’s easy to use, it’s not the easiest to use. We have other plugins on this list that simplify the process even more. (Of course, those may have other downsides for you.)

How to Take a Backup with UpdraftPlus

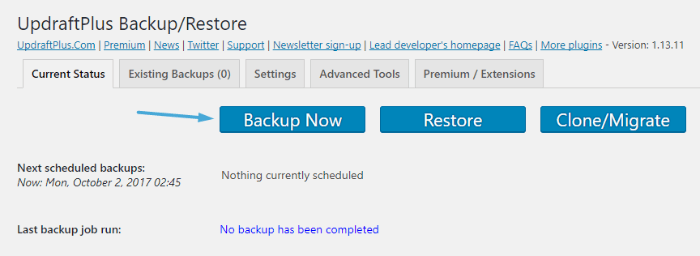
Once you install and activate UpdraftPlus, you can access its settings by heading to Settings → UpdraftPlus.

To run a manual backup, you just need to click the big blue Backup Now button:

UpdraftPlus backup restore

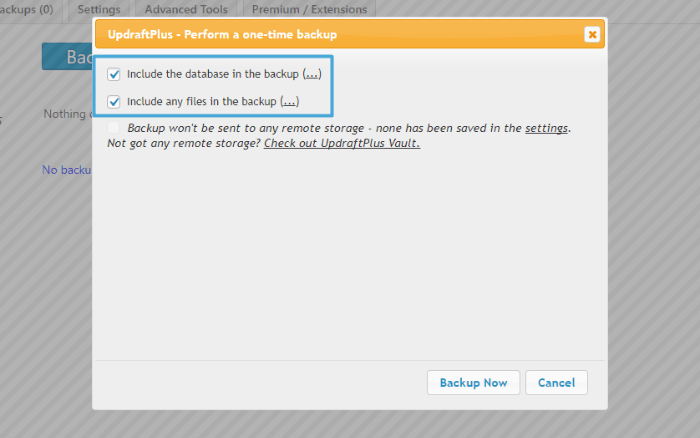
Then, you can choose whether to back up your entire site, or just a specific part:

UpdraftPlus - choose backup

And that’s all there is to it! Depending on the size of your site, the backup may take a few minutes to create.

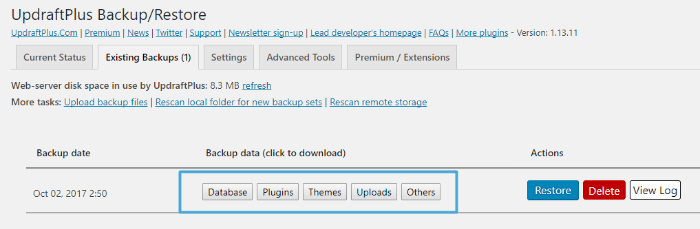
Once it’s finished, you can download the files to your computer by visiting the Existing Backups tab:

UpdraftPlus - download files

Something to note about UpdraftPlus is that it divides its backups into different files. You need to download all five files to have the full backup of your site.

Of course, one of the benefits of UpdraftPlus is that you don’t actually have to manually run your backups.

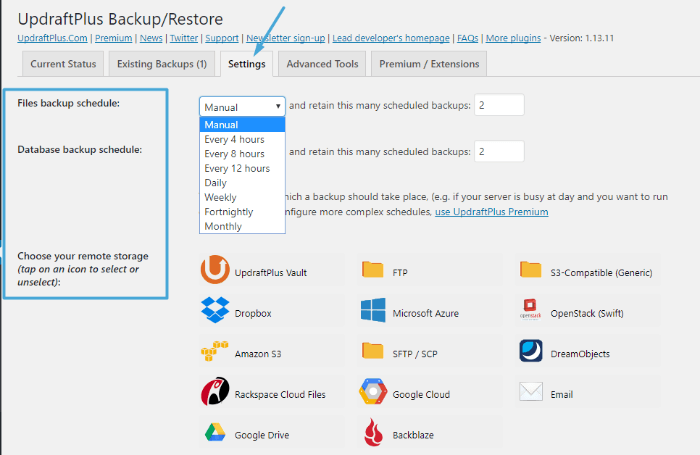
If you want to set up automated backups and/or off-site backups, you can do that by going to the plugin’s Settings tab, and choosing how often you’d like to run a backup:

UpdraftPlus - set up backups

As you can see on the image above, you can also choose a remote storage option, so you don’t have to rely on the backups on your server.

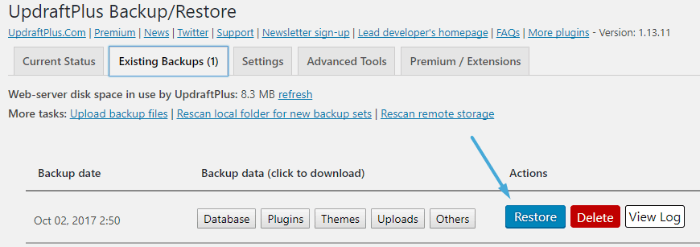
How to Restore Your Site from Backup with UpdraftPlus

UpdraftPlus lets you restore from backup in two ways.

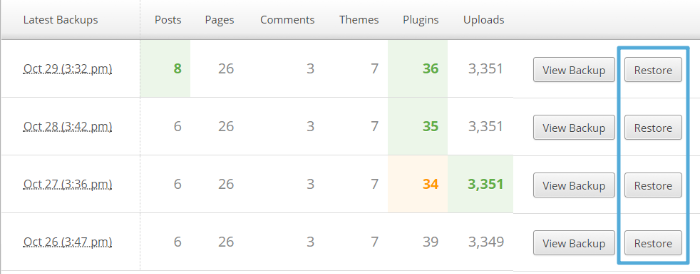
First, you can run a one-click restore by going to the Existing Backups tab and clicking the Restore button:

UpdraftPlus - one click restore

Note: This only works if the backup you want to restore from is still on your server.

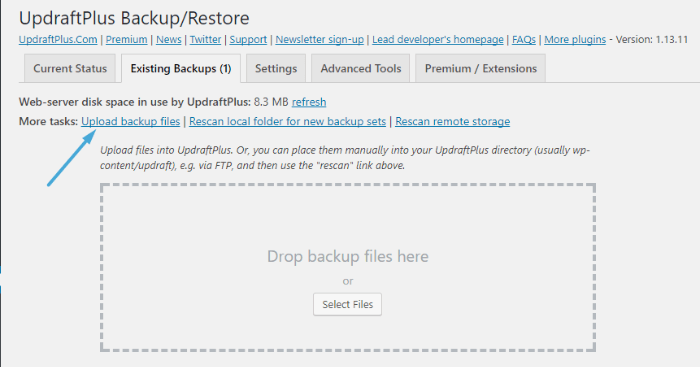
Second, you can upload a set of backup files from your own computer or from remote storage. You’ll need to upload all five backup data files to get a full backup.
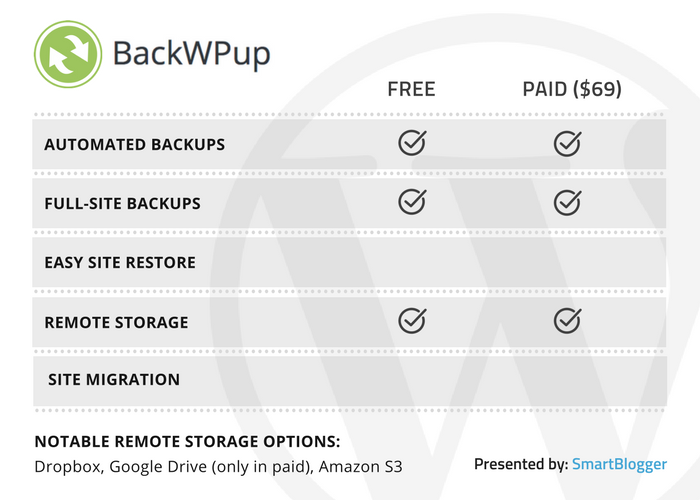
UpdraftPlus - upload backup files

#2: BackWPup


BackWPup is another popular WordPress backup plugin with over 600,000 active installs.

Here’s what you get with this plugin:

  • Full or partial site backups
  • Automated backups via a few different methods
  • Off-site backup to Dropbox, email, S3 services, and others (Google Drive is not available in the free version, though)

And here’s one unique, though niche, BackWPup feature:

The free version works with WordPress MultiSite. Most WordPress backup plugins lock MultiSite support behind their Pro versions.

You may notice one feature missing from this list, though — BackWPup does not offer a tool to restore from backup. You’ll have to do that manually.

BackWPup - table

Who Is BackWPup Good For?

BackWPup is more flexible than UpdraftPlus in certain aspects as it offers more customization options when it comes to how and what to backup. But those same customization options make the plugin less user-friendly than UpdraftPlus and might feel overwhelming to casual bloggers.

For example, you can run backups via WP-CLI, export backups as WordPress XML files, trigger backups by visiting an external URL, and more.

If you’re a WordPress beginner, that might all  sound like gibberish to you, which is okay, because you won’t need those options. But advanced WordPress users should appreciate them, especially the WP-CLI integration.

So unless you want those advanced options, I recommend you choose one of the simpler backup plugins on this list.

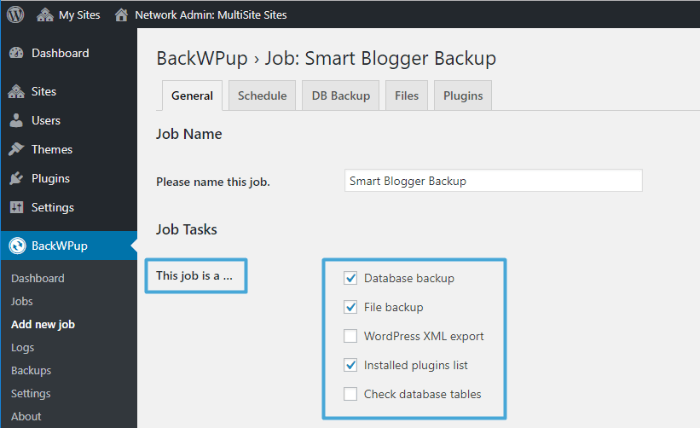
How to Take a Backup with BackWPup

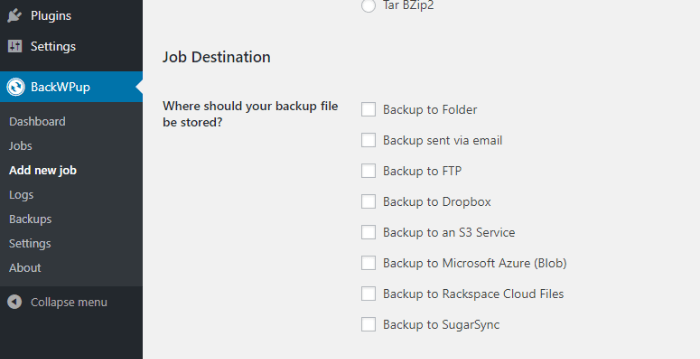
To start running backups with BackWPup, you need to create a Job. A Job is basically any task that you want the plugin to complete:

BackWPup - create a job

You can also choose where to send the results of your Job:

BackWPup - job destination

As well as whether to run that job manually or via some type of automation:

BackWPup - job schedule

From the screenshots above, I think you’ll be able to see why I don’t recommend this plugin for beginners. Unless you’re a power WordPress user, terms like WordPress cron and WP-CLI mean nothing to you.

How to Restore Your Site from Backup with BackWPup

Again, BackWPup does not currently offer a dedicated restore-from-backup tool. Instead, you’ll need to manually restore your site by uploading the actual files via FTP and importing your database.

While that’s not too hard to do, this is another reason why BackWPup is not a great option for beginners.

The developers are working on adding a restore tool to their plugin, though, so this may change in the near future.

#3: VaultPress/Jetpack


VaultPress is part of the Jetpack plugin from Automattic, the same company behind WordPress.com. It’s designed to make things as easy as possible for you to both back up and restore your site (if needed). Essentially, it puts your backups on autopilot.
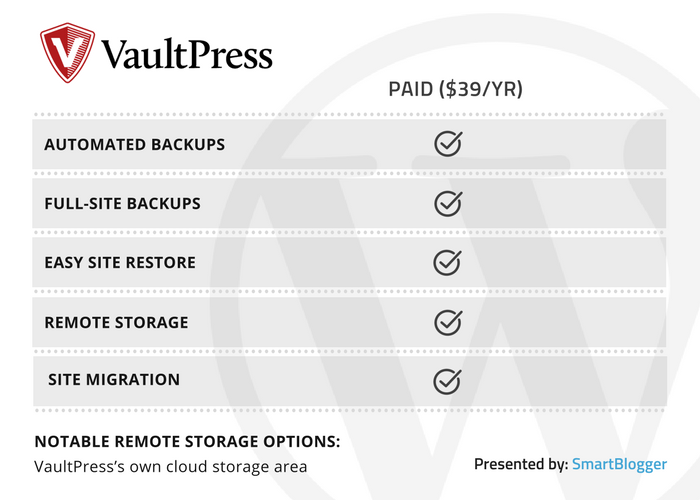
That means:

  • Automatic daily and real-time backups. Yesreal-time means that any time you make a change on your site, that change gets synched right away.
  • 30 days of backup storage in the VaultPress cloud
  • One-click restores from the VaultPress interface
  • Easy migrations — restore to different sites with the click of a button

And beyond backups, on the higher tier plans, VaultPress also scans your site for vulnerabilities and helps you fix any problems that it discovers.

Sounds pretty slick, right? So what’s the catch? Well, unlike all of the other plugins on this list, there’s no free version.

If you want to use VaultPress, you have to pay their yearly fee.

VaultPress - table

Who Is VaultPress Good For?

In terms of pure ease of use, VaultPress is the best option for beginners and casual WordPress users. It’s simple and pretty much hands-free. There is a small one-time setup to enable one-click restores, but once you complete that, VaultPress requires essentially zero manual input.

So if you’re looking for the absolute easiest WordPress backup solution, this is it. Just remember that you’re going to pay $39 per year for that ease of use, whereas something like UpdraftPlus is almost as simple without the price tag.

How to Take a Backup with VaultPress

Even though VaultPress is part of the Jetpack subscription plan, it’s technically a separate plugin. So before you can get started taking backups, you’ll need to install and activate both Jetpack and VaultPress. The process is straightforward, but if you need help you can find instructions for both Jetpack and VaultPress.

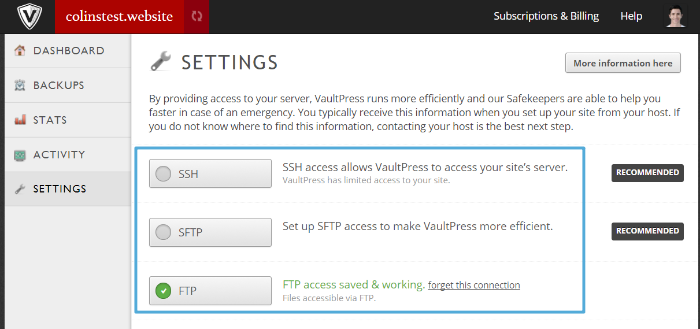
Once you have both those plugins up and running, VaultPress automatically starts working. While you don’t technically need to configure anything for it to take your first backup, if you have a large site, you might want to give VaultPress remote access through SSH or FTP to speed up the process:

VaultPress - settings

If you’re not sure why/how to do this, VaultPress has a support article on the subject and you can always reach out to Jetpack/VaultPress support or your host’s support.

Once VaultPress completes your first backup, you can manage all your backups from the VaultPress interface. If you want, you can also download physical copies to your local computer for safekeeping:

VaultPress - manage backups

How to Restore Your Site from Backup with VaultPress

To enable one-click restores, you’ll first need to give VaultPress remote access to your site (if you haven’t already configured it to speed up your backups).

Again, if you’re not sure just how to do that, give this support article a read. Or you can always reach out to Jetpack/VaultPress support and/or your host’s support team.

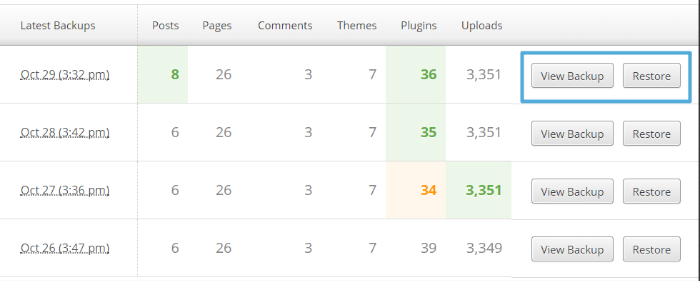
Once you complete that one-time setup process, all you need to do to restore your site is click a button in the VaultPress interface:

VaultPress - restore

#4: Duplicator


Duplicator is a popular and well-rated WordPress migration plugin. Because there’s a good deal of overlap between what happens when you migrate a site and what happens when you backup/restore a site, Duplicator functions great as a backup tool as well.

That said, many of the backup features that come for free in the other plugins are only available in the paid Duplicator Pro plugin.

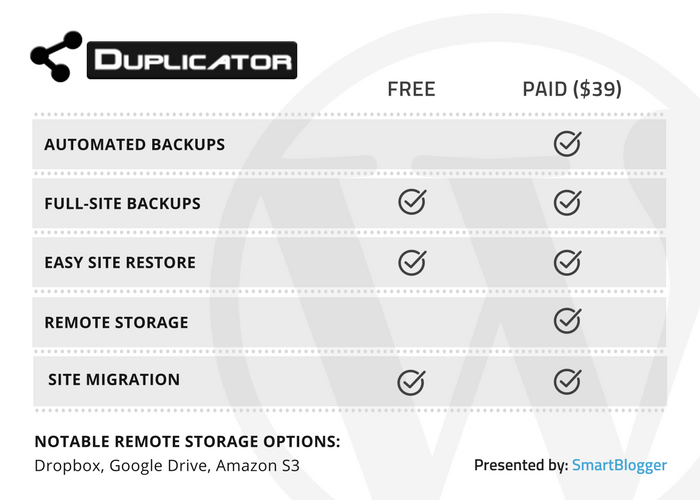
Here’s what you can do in the free version of the plugin:

  • Download a full site backup
  • Fairly easy restore from backup (though it’s not a one-click restore)
  • Easy site migrations

And if you upgrade to Duplicator Pro, here’s what you’ll get:

  • Scheduled backups
  • Off-site storage at Dropbox, Google Drive, Amazon S3
  • Special support for extra-large websites
Duplicator - table

Who Is Duplicator Good For?

Duplicator is a good option for intermediate users and above.

As someone who works with WordPress for a living, I find it convenient and often use it to move sites around and back them up. But I don’t believe it’s as good an option for beginners as tools like UpdraftPlus or VaultPress.

Here’s how it shakes out:

If you’re comfortable using FTP, you might enjoy this plugin for its convenience and flexibility. But if you just want a simple backup utility, some of the other plugins are better suited for you.

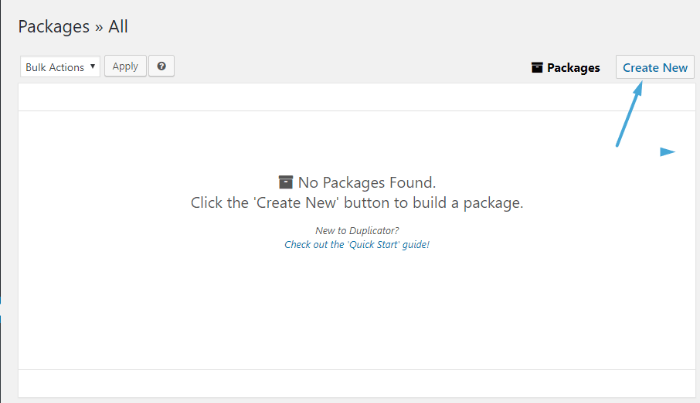
How to Take a Backup with Duplicator

To back up your site with Duplicator, you’ll need to create something called a Package.

Duplicator - create a package

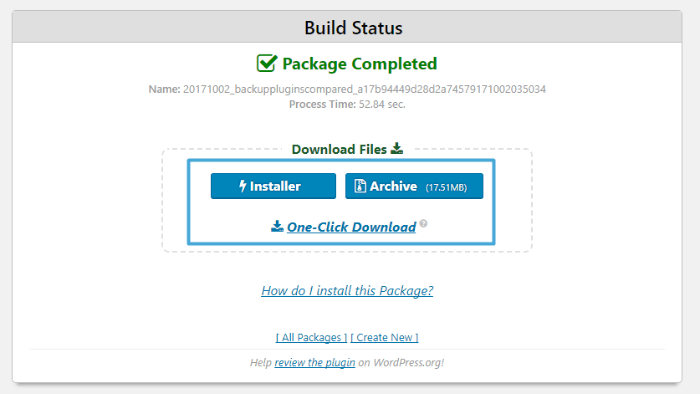
A Package consists of two files:

  • Installer — contains a setup wizard that helps you migrate or restore your site
  • Archive — contains a complete backup of your WordPress site
Duplicator - package completed

Put together, those two files are all you need to completely back up your WordPress site.

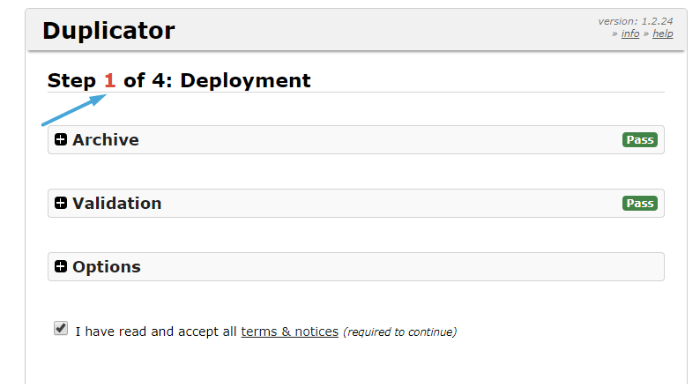
How to Restore Your Site from Backup with Duplicator

Whether you’re migrating your site or restoring your site from backup, Duplicator uses the same process.

It’s not as simple as something like UpdraftPlus, but it is more streamlined than the completely manual process offered by BackWPup.

Basically, you’ll need to use FTP or cPanel to upload both files to the server where you want to restore or migrate your site.

Then you can go to yourdomain.com/installer.php and follow the plugin’s four-step wizard to restore your site. The only slightly technical thing that you’ll need to do is create an empty database for Duplicator to connect to (here’s how to do that in cPanel, the most common hosting management tool):
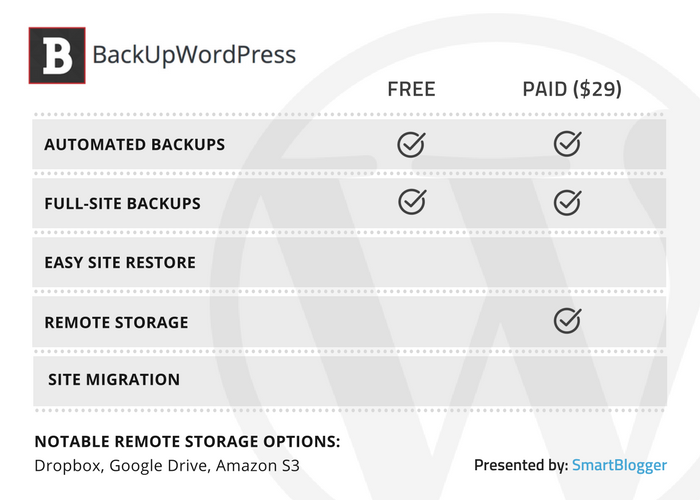
Duplicator - restore site

#5: BackUpWordPress


BackUpWordPress is a backup plugin from Human Made, one of the largest WordPress development agencies. In addition to working with enterprise clients like USA Today, they’ve also created some of their own products like BackUpWordPress.

With BackUpWordPress, you can:

  • Take complete site backups or database backups
  • Create separate schedules for complete backups and database backups

If you upgrade to the Pro version starting at $29, you’ll also get the ability to back up to off-site storage like Google Drive, DropBox, Amazon S3 and more.

BackUpWordPress - table

Who Is BackUpWordPress Good For?

BackUpWordPress is a great option for casual users who want something that works out of the box. There’s literally nothing you need to configure — just activate and go.

On the other hand, it doesn’t currently offer a dedicated restore function. That means the simplicity only extends to actually backing up your site, not restoring it.

Also, in the free version, you don’t get remote storage, so you have to manually download your backups on a regular basis.

How to Take a Backup with BackUpWordPress

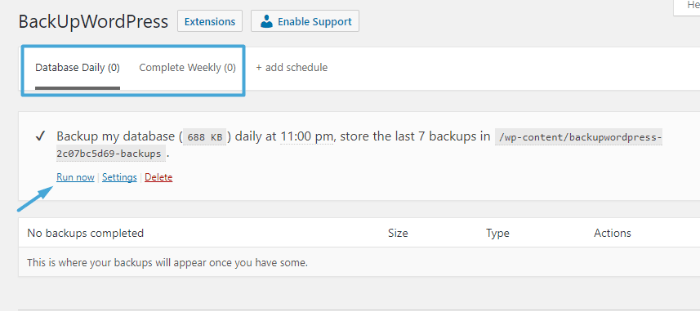
As I mentioned, you don’t actually need to do anything after activating the plugin. By default, BackUpWordPress starts off with backups already scheduled.

It will:

  • Back up your database every day
  • Back up your entire site every week

If you want, you can always manually create a backup by clicking Run now:

BackUpWordPress - manually create database

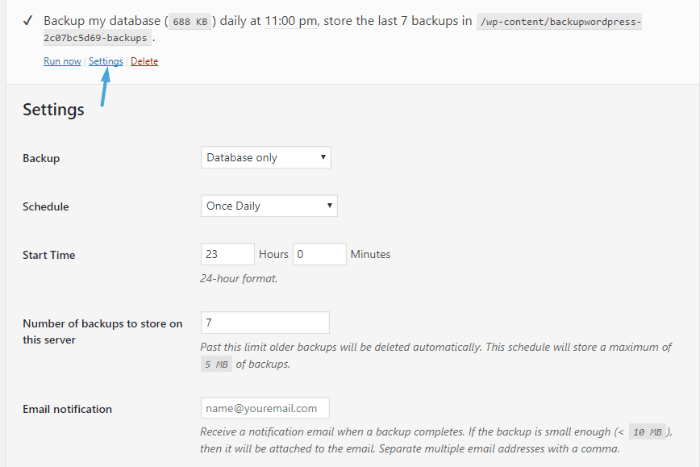
And you can also change the default schedule by clicking on Settings:

BackUpWordPress - change default schedule

In the free version, you’ll then need to manually download your backups to your local computer in order to ensure that you always have a working copy available. While the plugin will store backups on your server (according to your settings), this is not a safe way to store your backups long-term because if something happens to your server, you’ll be unable to access your backups.

How to Restore Your Site from Backup with BackUpWordPress

Again, BackUpWordPress does not have a dedicated restore function. To restore your site from backup, you’ll need to upload all of the files via FTP and import your database via phpMyAdmin.

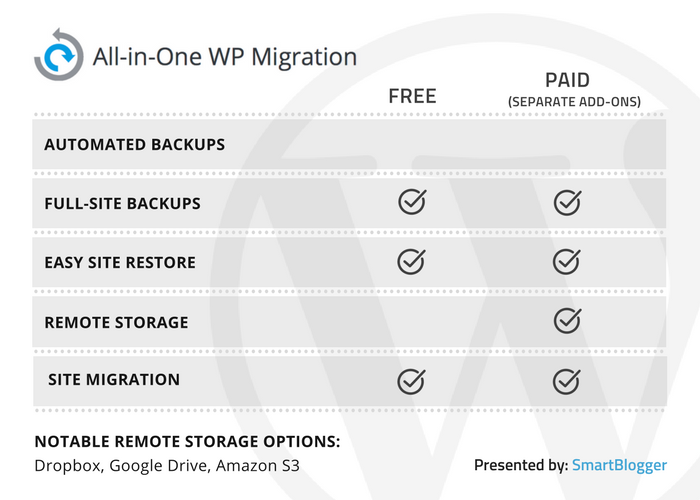
#6: All-in-One WP Migration


Like Duplicator, All-in-One WP Migration is a migration plugin that serves double duty as a backup plugin. One thing that’s nice about All-in-One WP Migration, though, is that it offers a simpler restore process than Duplicator.

The plugin gives you:

  • Full or partial backups
  • Easy restore from backup
  • Functionalities that make migrating your site a breeze

You can also purchase individual premium extensions for off-site backups at cloud storage providers like Google Drive, Dropbox, OneDrive, and more.

There’s no way to put your backups on an automatic schedule, though.

All-in-One WP Migration - table

Who Is All-in-One WP Migration Good For?

Because it lacks scheduled backups, All-in-One WP Migration is good for users who are willing (or even prefer) to handle things manually.

One advantage that All-in-One WP Migration has over some of the other backup plugins is that it gives you a good deal of control over which files you export, which is helpful if you only want to take partial backups.

Most of the time, you’ll probably want to take full backups anyway, so this isn’t a huge advantage for casual users. But partial backups can be helpful if you’re running an especially large site where taking a full backup every day takes up too much space and/or processing power.

For example, if you use tons of high-resolution images that don’t change very often, it’s a waste of resources to back up those files every single time you take a backup.

For most casual users, one of the plugins that focuses specifically on backups will offer a more streamlined solution.

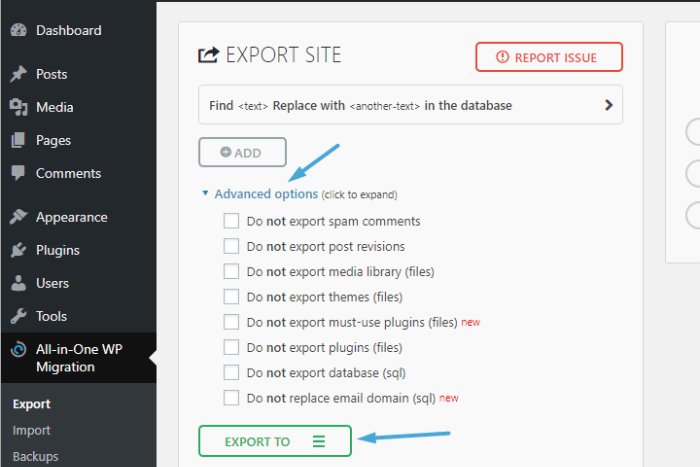
How to Take a Backup with All-in-One WP Migration

To create a backup of your site, you need to Export it. You can export your entire site or exclude certain elements by using the Advanced options:

All-in-One WP Migration - create backup

Once you export your site, the plugin will prompt you to save the file to your computer (or your offsite location if you purchase a premium extension). And the files will also show up in the Backups tab of the plugin.

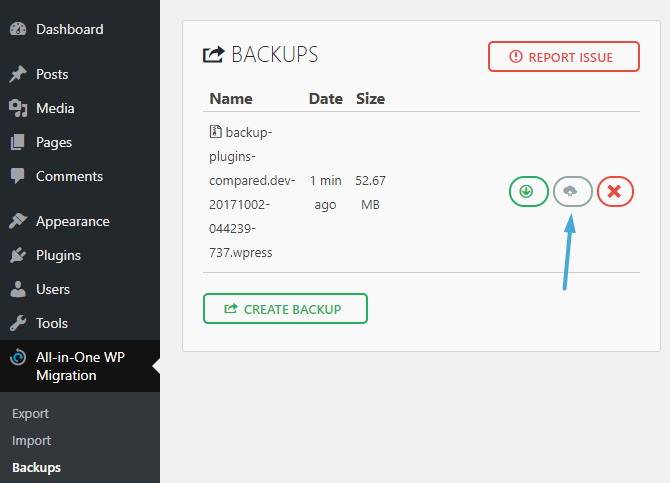
How to Restore Your Site from Backup with All-in-One WP Migration

To restore your site from a backup, you have two options.

First, you can go to the Backups tab and click the restore button:

All-in-One WP Migration - restore

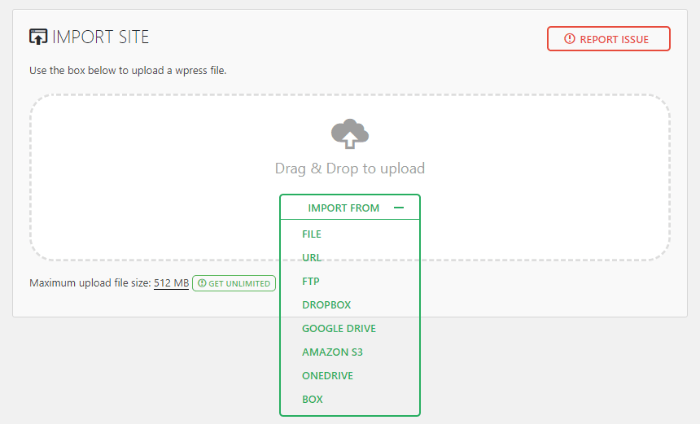
Second, you can go to the Import tab and upload a previously exported file from your computer or a remote storage location:

All-in-One WP Migration - import
Note: One well-known plugin that’s missing from this list is BackupBuddy. We intended to include it, but unfortunately iThemes does not offer a trial version, maintains a strict no-refund policy and did not respond to any of our requests for a demo licence. 🙁
 

Start Taking Backups and Sleep Easy Knowing That Your Site is Protected

Peace of mind is a beautiful thing.

And after you start using one of these WordPress backup plugins, that’s exactly what you’ll have.

Don’t wait — choose the plugin you like the best, install it, and create your first backup.

Then, no matter what happens to your site, you’ll always have a working copy tucked safely away.

And that means you can sleep easy knowing the work you’ve put into your site is safe and secure.

Author bio: Colin Newcomer is a freelance writer for hire with a background in SEO and affiliate marketing. He helps clients grow their web visibility by writing primarily about digital marketing and WordPress. In his spare time, he travels and curates graphic t-shirts.
 

from
https://smartblogger.com/wordpress-backup-plugin/