Thursday, November 30, 2017

How to Write a Bio that Convinces Readers You’re Their Personal Superhero

Writing a bio is hard.

You have to knock ’em dead with two or three dazzling sentences that show you’re a likable, credible, and accomplished expert.

When readers read your bio, they must believe you’re the answer to their prayers — the superhero they’ve been waiting for, that will swoop in and solve that big problem they’ve been dealing with.

But your bio makes you sound more like a superdweeb than a superhero, and every time you land a guest post, only a trickle of readers ends up on your site.

“What about my brilliant post?” you want to yell at your computer. “Wasn’t that enough?”

No, it wasn’t, and that’s the point.

By the time people get to your bio they’ve read your post to the end (high five for that!). You’ve earned their attention. But unless you can convince them you have more to offer them, they’re gone.

So you need to make every word count.  

Luckily, I can show you a simple three-step process to do exactly that. But first, let’s look at some common bio blunders and how to avoid them.

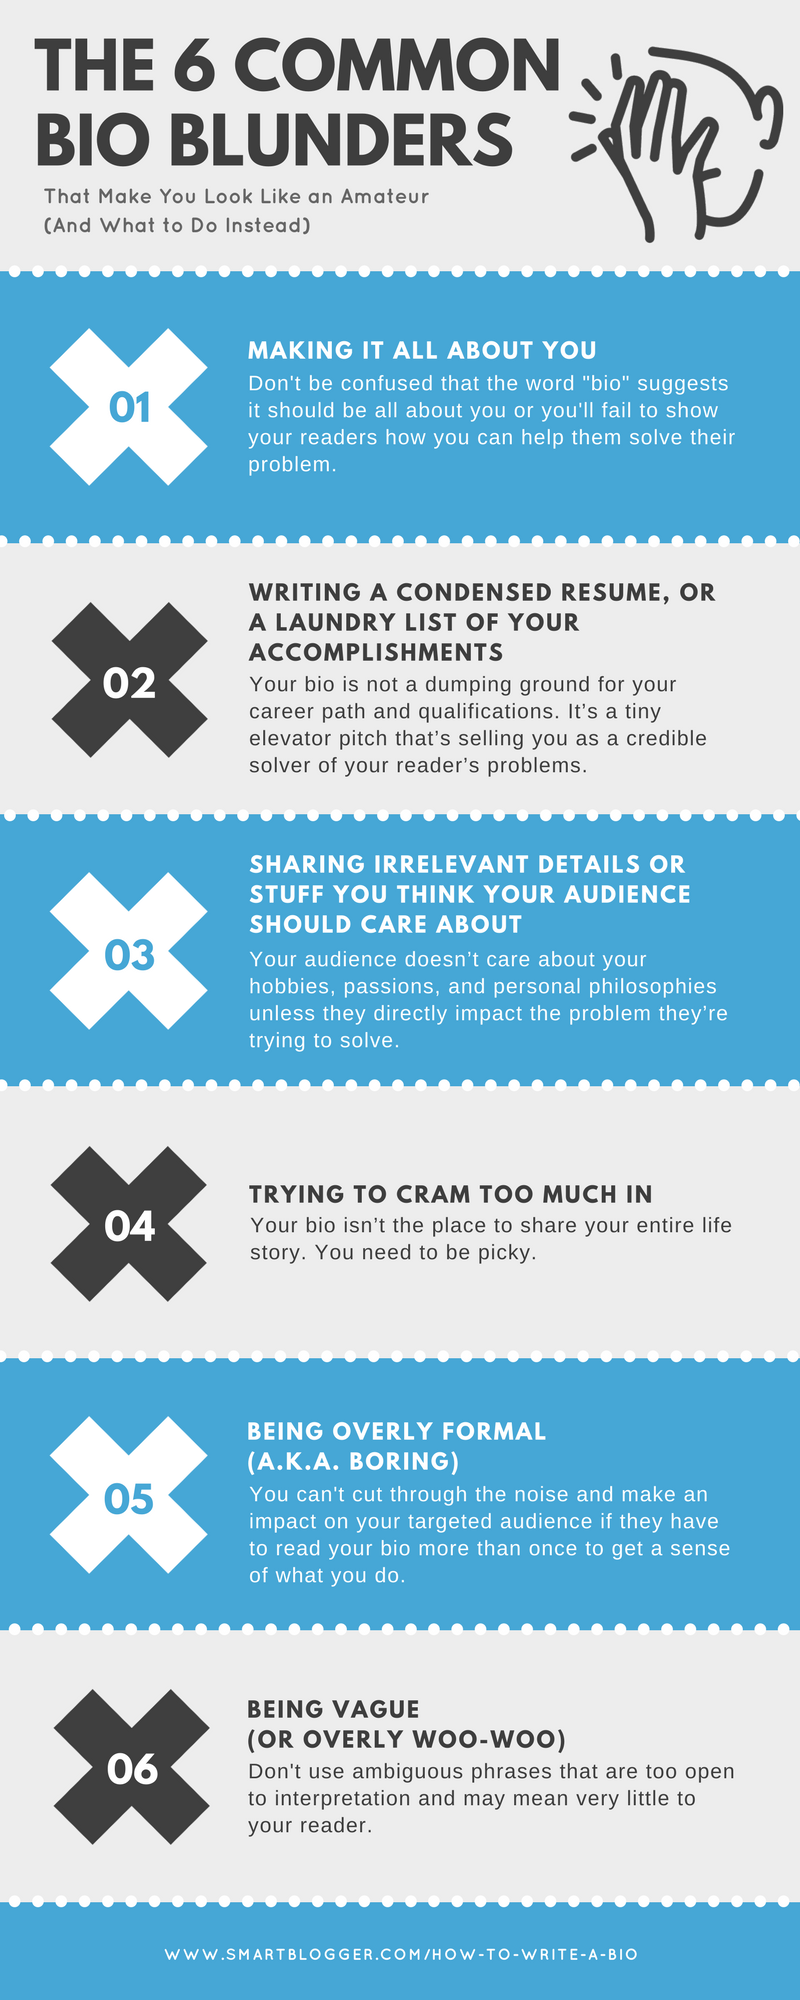
The 6 Common Bio Blunders That Make You Look Like an Amateur (And What to Do Instead)

#1: Making It All About You


I’m Jill — a free-spirit with a passion for quilting, bird watching, Tai Chi, and calligraphy.”
 
Thanks for sharing, Jill. But do I really care? Nah.

It’s confusing, I know. “Bio” is short for biography, which suggests it should be all about you.  But the main purpose of your author bio is to show your audience how you can help them solve their problem with the skills you bring to the table.

So, it’s not about you, Jill. It’s about them.

What to Do Instead:

In this post, using almost the same amount of words, Ayodeji gives us just enough information about himself to tell us what he does and how he helps his audience.

Ayodeji is a writing coach who helps aspiring writers develop the confidence and habits they need to make an impact and income. Visit his page to get three free writing guides, plus a copy of his bestselling Amazon book.
 
It’s clear, precise, and focused on the outcome, not on Ayodeji. He uses phrases like “develop the confidence and habits,” and “make an impact and income,” which directly target the deep-rooted desires of aspiring writers.  He speaks their language.

Here’s another tip: It’s usually best to write your bio in the third person, as Ayodeji has. It’s more professional.

#2: Writing a Condensed Resume, or a Laundry List of Accomplishments


John Brown is a qualified personal trainer with a sports medicine degree from Fremont College, as well as professional certifications from the American College of Sports Medicine and the National Strength and Conditioning Association.
 
Your bio is not a dumping ground for your career path and qualifications. It’s a tiny elevator pitch that’s selling you as a credible solver of your reader’s problems.

So don’t list every degree you have or talk about your first job out of school. Readers don’t really care. They only care whether or not you have the solutions they are looking for.

What to Do Instead:

Your bio should only include details about yourself that directly relate to your audience’s problem.

Think about your career, education, and skills, and then carefully select the most pertinent facts that are going to impress the audience you are writing for. Like this:

Jessi Rita Hoffman is a book editor who helps authors get their books out of their heads and into print. A former publishing house editor-in-chief, she has edited books for Donald Trump and bestselling/award-winning authors. Visit her blog for writers here.
 
Jessi tells us the most important thing about herself (that she is a book editor), and what she can do for her audience (get their books into print), while establishing her credibility (“best-selling,” “editor-in-chief”).

Everything she mentions is designed to appeal to the audience she’s trying to reach.

#3: Sharing Irrelevant Details or Stuff You Think Your Audience Should Care About


Joe Brown is a content marketer with a passion for snowboarding. When he’s not at his computer, you can find him at his nearest half-pipe, or maybe on Twitter @joeb, where he likes to tweet about his pet python. Alternatively, try his email at joe@xyz.com, and he’ll probably shoot you back a list of his favorite origami folds.
 
This bio is from someone whose expertise is content marketing, although he hides it well.

Much like your degrees and career path, your audience doesn’t care about your hobbies, passions, and personal philosophies either, unless they directly impact the problem they’re trying to solve.

What to Do Instead:

As mentioned earlier, only share the details that your audience will find relevant.

If you’re mad keen on knitting and you’re writing for an arts and crafts blog, then go ahead and mention your passion. It’s relevant. But don’t tell them about your cat, unless Fluffy can knit too.

#4: Trying to Cram Too Much In


Okay, so you’ve managed to include only relevant details about yourself, so you’re safe. Right?

Not if you included too many of them.

Like this one from Jo. She’s had an impressive career, but her bio feels endless:

Jo Smith is a personal finance blogger with 20 years of experience in accounting, international banking, and financial planning. She started as a trainee bank teller in Little Rock, Arkansas, before completing her accounting degree and climbing the corporate ladder at Citibank. More recently, Jo decided to follow her dreams and leave the safety net of her six-figure salary to start her own coaching business. Jo is on a mission to help everyday families and couples stop dreaming and start living the life they’ve always wanted through sustainable wealth building, and planning for their future financial security.
 
This is way too much information.

Writing your own bio can be hard. Sometimes you’re too close to the subject matter to realize what’s important and what can be left out. But your bio isn’t the place to share your entire life story. You need to be picky.

What to Do Instead:

With some careful pruning, the real gems hidden away in Jo’s bio can be given center stage:

Jo Smith is a personal finance blogger and coach with 20 years of experience in the high-powered world of international banking and accountancy. Jo is on a mission to help everyday families build sustainable wealth, stop stressing about their financial security, and start living the life they’ve always wanted.
 
Go through your bio word by word and ask yourself, “Does this bit of information make any difference to my audience?”

If the answer is no, take it out, and limit your bio to two or three sentences.

#5: Being Overly Formal (a.k.a. Boring)


Joe Jones is an accomplished marketing consultant who specializes in the field of physician practices. He works with medical centers and practitioners to maximize their online real estate, garner new market segments, and engender business growth.
 
If you’re anything like me, you had to read this bio more than once to get a sense of what Joe does. It’s way too formal. Most people will just glaze over this.

What to Do Instead:

Instead of using stilted words and phrases like “maximize their online real estate” and “engender business growth” Joe missed a great opportunity to make himself stand out from the crowd by creating a point of interest.

Perhaps he could have started with something like:

“Joe Jones is an expert marketer who can take your medical practice from queasy to fighting fit…”
 
Do you see how that might grab a few more eyeballs, cut through the noise, and make an impact with his target audience of doctors?

#6. Being Vague (or Overly Woo-Woo)


Cecile is a life coach and devoted mom. She loves day breaks and giving things a go. She is passionate about her fellow humans and wants to be their inspiration for growth, as they find their way through the dark to their true self.
 
Hands up, whoever doesn’t have a clue what this person is talking about. What does she do? How does she help solve my problem? Why should I be interested in her?

You need to avoid ambiguous phrases like “inspiration for growth” and “find their way through the dark.” These phrases might have a nice ring to them, but they mean very little to your reader. They’re too open to interpretation.

What to Do Instead:

You don’t have time to beat around the bush in your bio. Get straight to the point. Like this:

Cecile is a qualified self-development coach who is passionate about helping professional women develop the skills and self-assurance they need to take control of their working lives. Download her free guide, How to Quit Your Dead-End Job Without Risking Your Income, and open the door to your dream career today.
 
In two sentences, Cecile tells me everything I need to know about what she does and how she can help me. No fluff, no messing about, and a juicy opt-in bribe to seal the deal.

Click on the image below to see a larger view:

Embed This Infographic On Your Site

The 6 Common Bio Blunders That Make You Look Like an Amateur (And What to Do Instead) from SmartBlogger.com

The 3-Step Process to Writing a Click-Worthy Author Bio

So now you can see where you might’ve gone wrong in the past, and you’re dying to write a new version. But how do you ensure your next bio won’t commit the same blunders?

Easy. Just follow this simple three-step process to write a bio that your ideal readers can’t resist clicking.

Step #1: Introduce Yourself with a Bang


This is where you tell the audience who you are and what makes you different (while avoiding the common blunders we’ve just discussed). You need to spark their interest and curiosity and get them to say, “Tell me more.”

Let’s start with this example from a blogger in the personal development niche.

Sue Smith is a self-help writer and coach with a degree in psychology…
 
This tells me what Sue does, but it’s rather dull and same-y in a sea full of personal development blogs. There’s nothing here to set her apart or pique our interest.

Let’s give it a twist:

Self-help writer, Sue Smith, is part social scientist, part agony aunt, who…
 
That sounds a bit more interesting. Sue manages to appeal to her audience on different levels by sounding educated, professional, and personable at the same time. Describing herself as an “agony aunt” downplays the more clinical “social scientist.”

I’m curious to know more, and it certainly makes her distinctive.

But there’s another angle Sue could take:

Sue Smith is a certified psychologist who specializes in beating social anxiety.
 
Now, this one is more similar to the first example, but the difference is that it adds more credibility — “certified psychologist” sounds much more credible than “has a degree in,” which suggests she’s fresh out of college — but it also sets her apart more.

She has a specialty, which gives her ideas on the topic more weight than others. If you suffer from social anxiety, you’d want to listen to the expert on it, right?

Compare also:

Sue Smith’s books on beating social anxiety have won her international acclaim. She has been featured as an expert on Psychology Today, The Oprah Winfrey Show, and Good Morning America.
 
This version goes even further in establishing Sue’s credibility. Not only has she published multiple books on the topic of social anxiety, but she’s even been featured on some well-known media channels, adding social proof to her expertise.

We’ve talked before about not delivering a laundry list of accomplishments, but if you have specific accomplishments that make you stand out, those are worth including.

Here’s an excellent bio example that both offers a point of interest and adds credibility:

Jessica’s outside-the-box approach to business plan writing has helped her clients collectively raise almost $50 million in financing to start and grow new businesses. Sign up for her 5-part business plan training series for FREE here so you can get your business plan done and get your money sooner.
 
Jessica doesn’t just say she’ll help you write a business plan, she mentions she has an “outside-the-box approach,” which immediately makes you curious what that approach is. Then she steps it up even more by mentioning her approach has collectively raised $50 million in financing. That’s nothing to sneeze at and creates instant credibility.

It’s an excellent bio that will absolutely pique her audience’s interest.

Step #2:  Call Out Your Audience and Say How You Help Them


Remember, this isn’t about you, it’s about what you can do for your audience. So you need to define who they are and what problem of theirs (their key fear or desire) you can solve.

You should aim for both a logical and emotional connection.  It’s tough, but do-able.

Let’s take Kim, a blogger in the parenting niche:

Kim’s passion in writing is to inspire other parents to not just “hang in there” or “make it through” but to thrive. She does this through blogging at kimbiasottotoday.wordpress.com and speaking.
 
By using language most parents will relate to and zeroing in on their fears, Kim makes a strong emotional connection. At the same time, there’s no mistaking the practical (logical) solution Kim offers.

Note: Of course, Kim’s bio would be even further improved if she linked to an incentive rather than her homepage. More on that in the next step!

Here’s another example:

Jessica Blanchard, registered dietitian and Ayurvedic practitioner, helps busy people re-energize with super simple food, yoga, and wellness strategies that work. Grab your free 7-Day Plan and learn to eat, move, and live better in ten minutes a day.
 
Jessica clarifies immediately who she helps (busy people) and how she helps them (by re-energizing them through food, yoga, and wellness strategies).

You must be absolutely clear about this. If readers can’t identify themselves in your bio and see you have the solution they’re looking for, they will move on.

Step 3:  Offer an Irresistible Reason to Click


You’ve told your audience who you are, what you do, and how you can help them. You’ve impressed them with your credentials and sparked their curiosity.

They’re ready to move to second base, but they need that last push. An irresistible reason to click through to your site and sign up. You need to offer an incentive.

Take a look at this bio:

Henneke Duistermaat is an irreverent copywriter and business writing coach. She’s on a mission to stamp out gobbledygook and to make boring business blogs sparkle. Get her free 16-Part Snackable Writing Course For Busy People and learn how to enchant your readers and win more business.
 
Boom! In 46 carefully curated words, Henneke tells us who she is, what she does, how she can help, and then gives us a gold-plated reason for parting with our email address.

Her free report is 16 parts, but it’s “snackable,” which makes it sound very easy to digest. And it’s for “busy people”, which shows that Henneke understands her audience. She promises results and cleverly relates this back to her own blog, Enchanting Marketing.

Unfortunately, we can’t all steal Henneke’s bio, but we can use it as a fine example of how to write our own.

Ready to Write Your Best Bio Ever?

This three-step process is simple, but it’s not easy, so give your bio the time it requires. You should brainstorm several options for each of the steps.

Bios are hard to craft, but they are also one of the most effective pieces of marketing you can create when you get it right.

Write your best bio ever and your audience will be intrigued. They’ll want to know more and they won’t be able to resist your free offer.

They’ll see you as a credible, personable problem-solver. Their problem-solver.

And they’ll click through to your site, ready and willing to hand over their email address to their new blogging superhero.

You.

About the Author: Mel Wicks is a seasoned copywriter and marketing strategist who helps bloggers and entrepreneurs put the “OMG! Where do I sign up?” into everything they write. Download her exclusive Fill-in-the-Gaps Cheat Sheet for an Instant Click-Worthy Author Bio.
 

from
https://smartblogger.com/how-to-write-a-bio/
Thursday, November 16, 2017

6 Best WordPress Backup Plugins Compared (100% Objective)

Imagine if one day your blog just disappeared.

It’s a terrifying thought, right?

You put all that work into writing amazing content and developing an audience. The last thing you want is for it all to go up in a puff of smoke because of some technical issue or hacker.

But if you don’t back up your website regularly, that’s exactly what would happen if something ever went wrong.

Thankfully, I have some good news for you:

Backing up your website isn’t something you need a developer for. Heck, it’s not even that complicated.

And with the right WordPress backup plugin, you’ll be able to sleep easy knowing that no matter what happens to your site, you can always have it up and running again in no time.

To help you get started on the right foot with WordPress backups, I’m going to spend this post going through six WordPress backup plugins and helping you choose the one that’s right for you.

But first…

Here’s What to Look For in a WordPress Backup Plugin

While the backup plugin that you eventually choose will depend on your personal preferences, there are a few key features you should at least consider when making your choice:

  • Does the plugin offer automation? Automated backups let you “set it and forget it.” In other words, it keeps you from having to remember to do it manually every week/month/whatever time frame.
  • Does the plugin take full or partial backups? All the plugins on this list offer full site backups. But if you search elsewhere, you will find some plugins that will only back up specific parts of your websites, like just your database or theme.
  • How does the plugin handle restoring from backups? Some plugins give you built-in tools, while others require you to manually upload the files and import your database.
  • Does the plugin work with remote storage? If the plugin doesn’t let you back up to remote storage, you’ll be entirely responsible for keeping your backup files safe. Some plugins will store your backups on your server, which can still be useful, but won’t help you if your server gets wiped clean.
  • Does the plugin offer site migrations? This is the least important question. But if you think you’ll move your site often — like from a local staging site (that you use for tests) to your live site — this feature comes in handy.

The 6 Best Backup Plugins Compared in Detail

In order to help you make your decision, I want to give you an actual idea how these plugins function in the real world. So, in addition to giving you each plugin’s feature list, I’ll also show you the actual process for how you can use the plugin to back up and restore your website.

Let’s dive in…

#1: UpdraftPlus


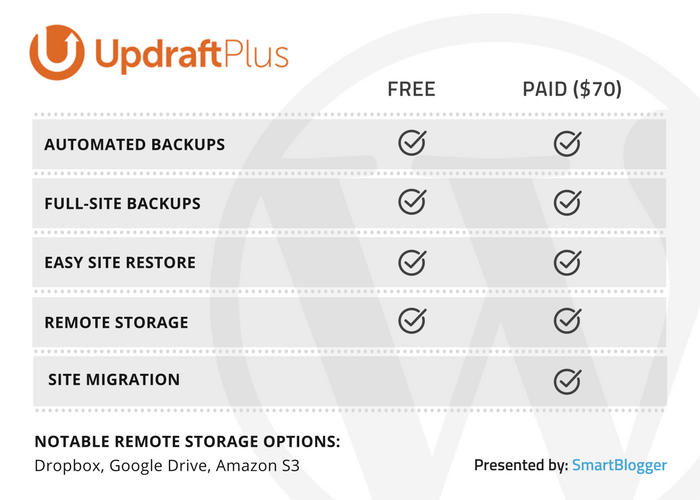
By the numbers, UpdraftPlus is the most popular backup plugin at WordPress.org. It also has a staggering five-star rating on over 2,672 reviews to help explain its popularity.

So, why do so many people like UpdraftPlus? Probably because it gives you nearly all of the points I discussed above without charging a penny (though there is a premium version with more features).

Here’s what you get with UpdraftPlus:

  • Manual or automatic backups (based on a schedule that you define)
  • Full-site backups or backups of specific parts of your site (like your database)
  • Easy restore from backup via a dedicated tool
  • Off-site backup to Dropbox, Google Drive, Amazon S3, and more
  • UpdraftVault dedicated backup storage, which is basically a dedicated cloud storage service for UpdraftPlus (storage costs extra, though)

In fact, the only feature that you might miss in the free version is a dedicated site migration tool. If you do want that migration feature, though, you can always purchase UpdraftPlus premium starting at $70.

UpdraftPlus table

Who Is UpdraftPlus Good For?

UpdraftPlus is the plugin I recommend for most casual bloggers because it strikes a good balance between flexibility/features and ease of use.

But while it’s easy to use, it’s not the easiest to use. We have other plugins on this list that simplify the process even more. (Of course, those may have other downsides for you.)

How to Take a Backup with UpdraftPlus

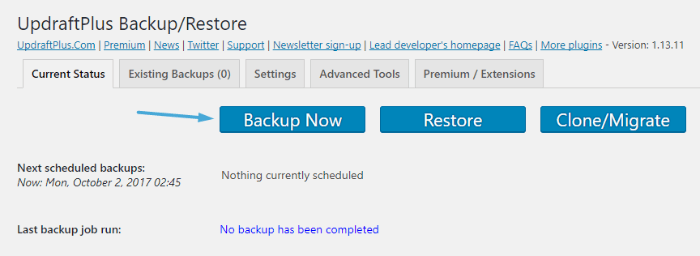
Once you install and activate UpdraftPlus, you can access its settings by heading to Settings → UpdraftPlus.

To run a manual backup, you just need to click the big blue Backup Now button:

UpdraftPlus backup restore

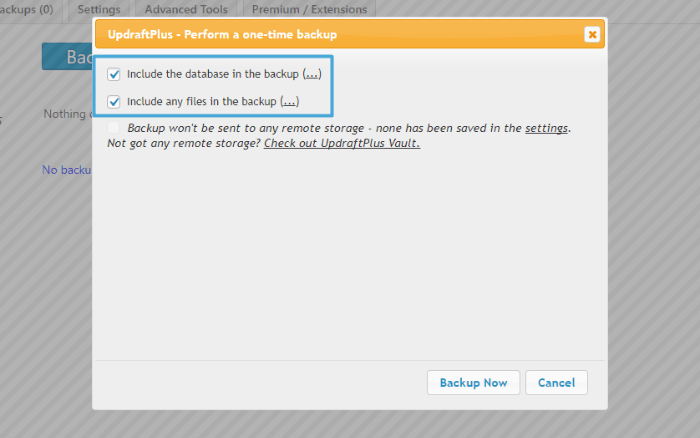
Then, you can choose whether to back up your entire site, or just a specific part:

UpdraftPlus - choose backup

And that’s all there is to it! Depending on the size of your site, the backup may take a few minutes to create.

Once it’s finished, you can download the files to your computer by visiting the Existing Backups tab:

UpdraftPlus - download files

Something to note about UpdraftPlus is that it divides its backups into different files. You need to download all five files to have the full backup of your site.

Of course, one of the benefits of UpdraftPlus is that you don’t actually have to manually run your backups.

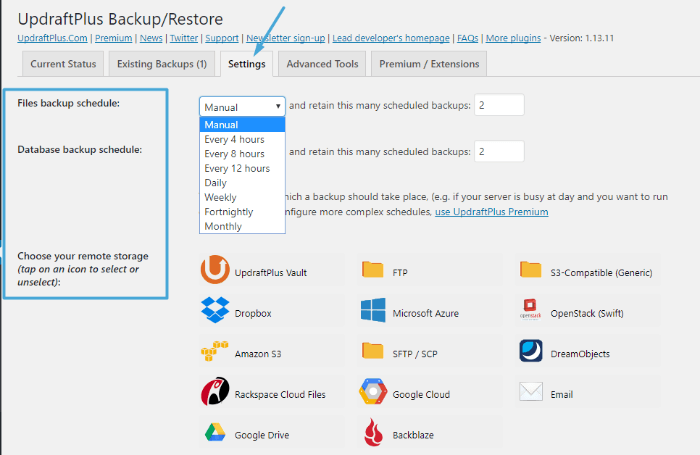
If you want to set up automated backups and/or off-site backups, you can do that by going to the plugin’s Settings tab, and choosing how often you’d like to run a backup:

UpdraftPlus - set up backups

As you can see on the image above, you can also choose a remote storage option, so you don’t have to rely on the backups on your server.

How to Restore Your Site from Backup with UpdraftPlus

UpdraftPlus lets you restore from backup in two ways.

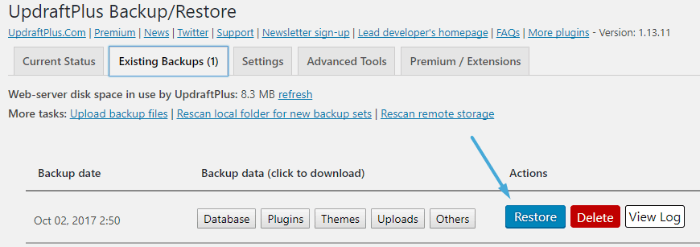
First, you can run a one-click restore by going to the Existing Backups tab and clicking the Restore button:

UpdraftPlus - one click restore

Note: This only works if the backup you want to restore from is still on your server.

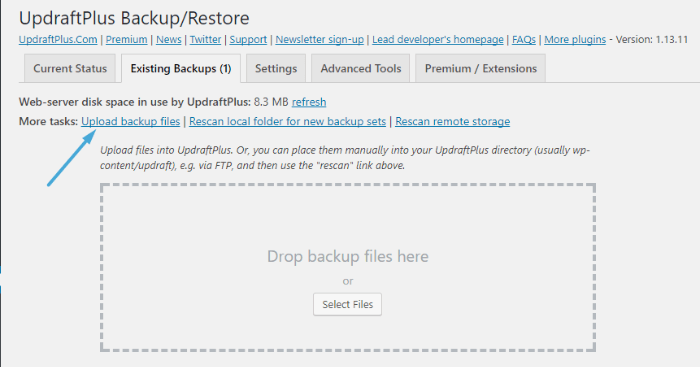
Second, you can upload a set of backup files from your own computer or from remote storage. You’ll need to upload all five backup data files to get a full backup.

UpdraftPlus - upload backup files

#2: BackWPup


BackWPup is another popular WordPress backup plugin with over 600,000 active installs.

Here’s what you get with this plugin:

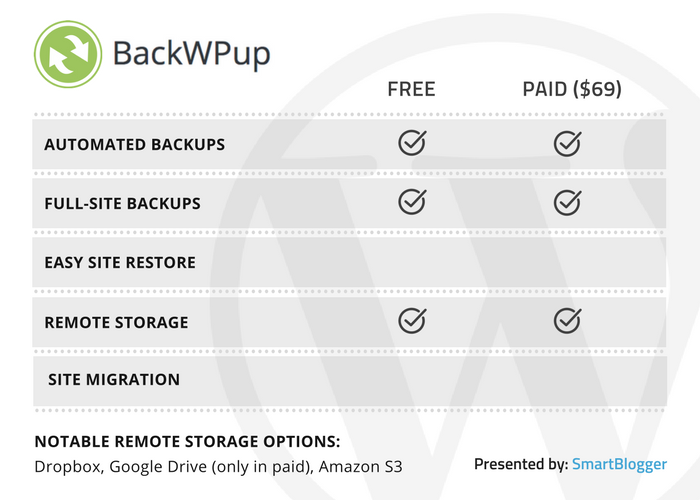
  • Full or partial site backups
  • Automated backups via a few different methods
  • Off-site backup to Dropbox, email, S3 services, and others (Google Drive is not available in the free version, though)

And here’s one unique, though niche, BackWPup feature:

The free version works with WordPress MultiSite. Most WordPress backup plugins lock MultiSite support behind their Pro versions.

You may notice one feature missing from this list, though — BackWPup does not offer a tool to restore from backup. You’ll have to do that manually.

BackWPup - table

Who Is BackWPup Good For?

BackWPup is more flexible than UpdraftPlus in certain aspects as it offers more customization options when it comes to how and what to backup. But those same customization options make the plugin less user-friendly than UpdraftPlus and might feel overwhelming to casual bloggers.

For example, you can run backups via WP-CLI, export backups as WordPress XML files, trigger backups by visiting an external URL, and more.

If you’re a WordPress beginner, that might all  sound like gibberish to you, which is okay, because you won’t need those options. But advanced WordPress users should appreciate them, especially the WP-CLI integration.

So unless you want those advanced options, I recommend you choose one of the simpler backup plugins on this list.

How to Take a Backup with BackWPup

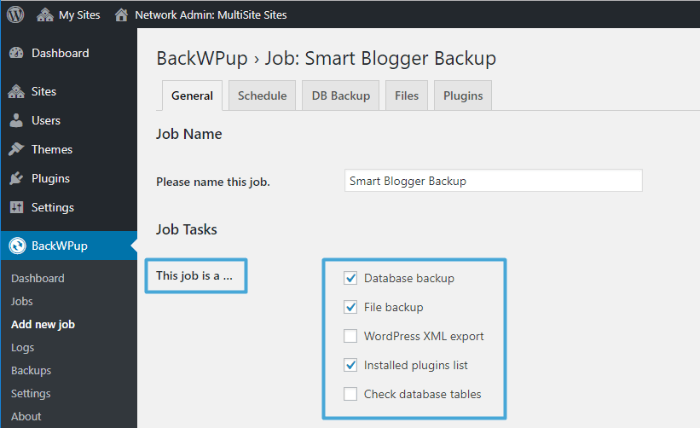
To start running backups with BackWPup, you need to create a Job. A Job is basically any task that you want the plugin to complete:

BackWPup - create a job

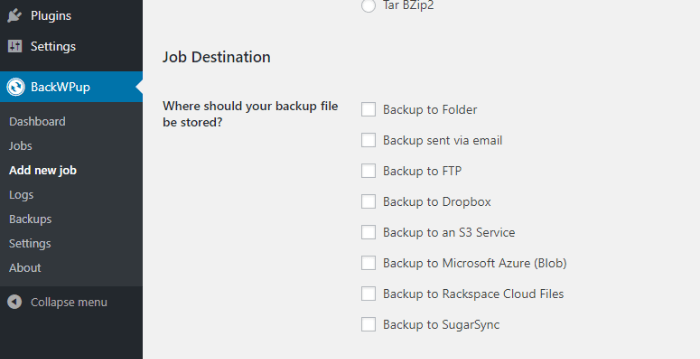
You can also choose where to send the results of your Job:

BackWPup - job destination

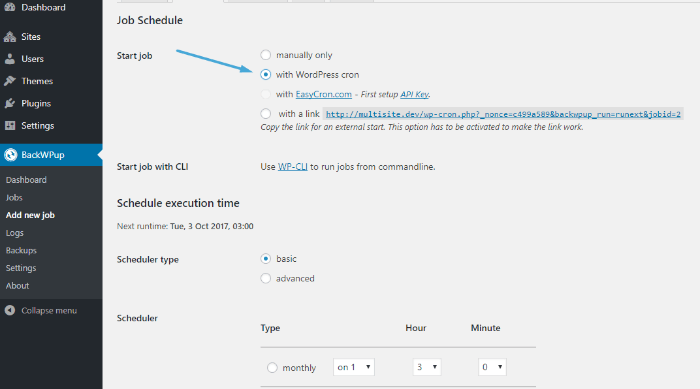
As well as whether to run that job manually or via some type of automation:

BackWPup - job schedule

From the screenshots above, I think you’ll be able to see why I don’t recommend this plugin for beginners. Unless you’re a power WordPress user, terms like WordPress cron and WP-CLI mean nothing to you.

How to Restore Your Site from Backup with BackWPup

Again, BackWPup does not currently offer a dedicated restore-from-backup tool. Instead, you’ll need to manually restore your site by uploading the actual files via FTP and importing your database.

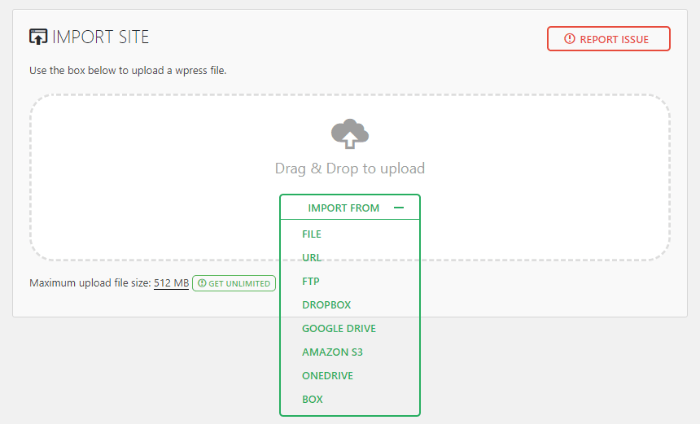
While that’s not too hard to do, this is another reason why BackWPup is not a great option for beginners.

The developers are working on adding a restore tool to their plugin, though, so this may change in the near future.

#3: VaultPress/Jetpack


VaultPress is part of the Jetpack plugin from Automattic, the same company behind WordPress.com. It’s designed to make things as easy as possible for you to both back up and restore your site (if needed). Essentially, it puts your backups on autopilot.

That means:

  • Automatic daily and real-time backups. Yesreal-time means that any time you make a change on your site, that change gets synched right away.
  • 30 days of backup storage in the VaultPress cloud
  • One-click restores from the VaultPress interface
  • Easy migrations — restore to different sites with the click of a button

And beyond backups, on the higher tier plans, VaultPress also scans your site for vulnerabilities and helps you fix any problems that it discovers.

Sounds pretty slick, right? So what’s the catch? Well, unlike all of the other plugins on this list, there’s no free version.

If you want to use VaultPress, you have to pay their yearly fee.

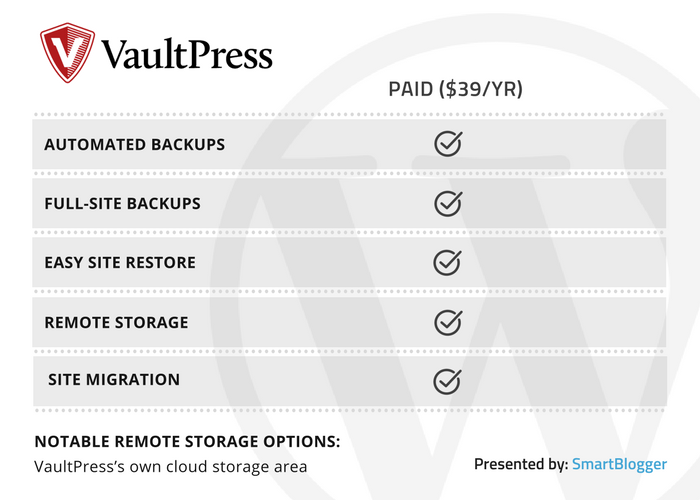
VaultPress - table

Who Is VaultPress Good For?

In terms of pure ease of use, VaultPress is the best option for beginners and casual WordPress users. It’s simple and pretty much hands-free. There is a small one-time setup to enable one-click restores, but once you complete that, VaultPress requires essentially zero manual input.

So if you’re looking for the absolute easiest WordPress backup solution, this is it. Just remember that you’re going to pay $39 per year for that ease of use, whereas something like UpdraftPlus is almost as simple without the price tag.

How to Take a Backup with VaultPress

Even though VaultPress is part of the Jetpack subscription plan, it’s technically a separate plugin. So before you can get started taking backups, you’ll need to install and activate both Jetpack and VaultPress. The process is straightforward, but if you need help you can find instructions for both Jetpack and VaultPress.

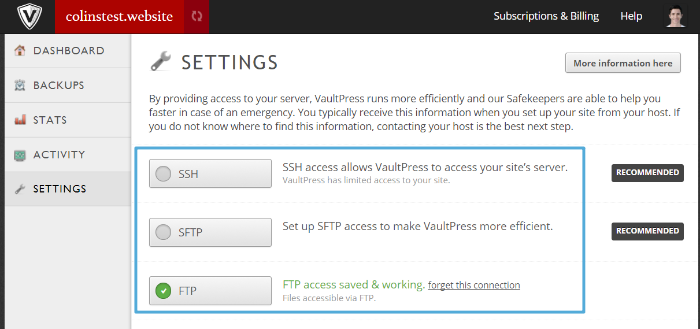
Once you have both those plugins up and running, VaultPress automatically starts working. While you don’t technically need to configure anything for it to take your first backup, if you have a large site, you might want to give VaultPress remote access through SSH or FTP to speed up the process:

VaultPress - settings

If you’re not sure why/how to do this, VaultPress has a support article on the subject and you can always reach out to Jetpack/VaultPress support or your host’s support.

Once VaultPress completes your first backup, you can manage all your backups from the VaultPress interface. If you want, you can also download physical copies to your local computer for safekeeping:

VaultPress - manage backups

How to Restore Your Site from Backup with VaultPress

To enable one-click restores, you’ll first need to give VaultPress remote access to your site (if you haven’t already configured it to speed up your backups).

Again, if you’re not sure just how to do that, give this support article a read. Or you can always reach out to Jetpack/VaultPress support and/or your host’s support team.

Once you complete that one-time setup process, all you need to do to restore your site is click a button in the VaultPress interface:

VaultPress - restore

#4: Duplicator


Duplicator is a popular and well-rated WordPress migration plugin. Because there’s a good deal of overlap between what happens when you migrate a site and what happens when you backup/restore a site, Duplicator functions great as a backup tool as well.

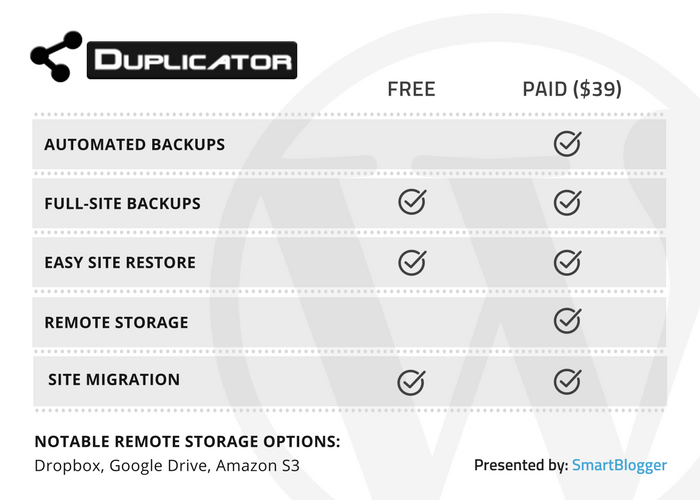
That said, many of the backup features that come for free in the other plugins are only available in the paid Duplicator Pro plugin.

Here’s what you can do in the free version of the plugin:

  • Download a full site backup
  • Fairly easy restore from backup (though it’s not a one-click restore)
  • Easy site migrations

And if you upgrade to Duplicator Pro, here’s what you’ll get:

  • Scheduled backups
  • Off-site storage at Dropbox, Google Drive, Amazon S3
  • Special support for extra-large websites
Duplicator - table

Who Is Duplicator Good For?

Duplicator is a good option for intermediate users and above.

As someone who works with WordPress for a living, I find it convenient and often use it to move sites around and back them up. But I don’t believe it’s as good an option for beginners as tools like UpdraftPlus or VaultPress.

Here’s how it shakes out:

If you’re comfortable using FTP, you might enjoy this plugin for its convenience and flexibility. But if you just want a simple backup utility, some of the other plugins are better suited for you.

How to Take a Backup with Duplicator

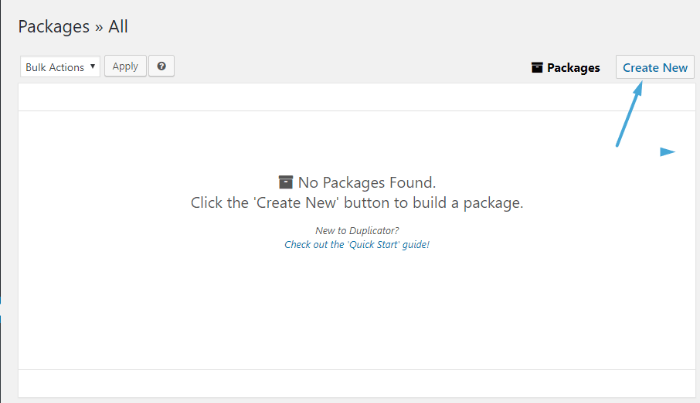
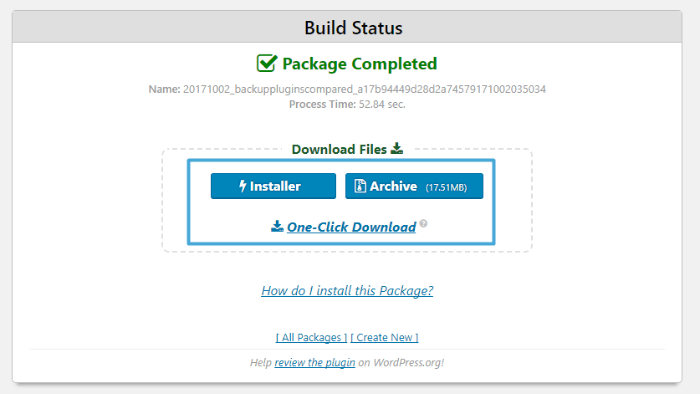
To back up your site with Duplicator, you’ll need to create something called a Package.

Duplicator - create a package

A Package consists of two files:

  • Installer — contains a setup wizard that helps you migrate or restore your site
  • Archive — contains a complete backup of your WordPress site
Duplicator - package completed

Put together, those two files are all you need to completely back up your WordPress site.

How to Restore Your Site from Backup with Duplicator

Whether you’re migrating your site or restoring your site from backup, Duplicator uses the same process.

It’s not as simple as something like UpdraftPlus, but it is more streamlined than the completely manual process offered by BackWPup.

Basically, you’ll need to use FTP or cPanel to upload both files to the server where you want to restore or migrate your site.

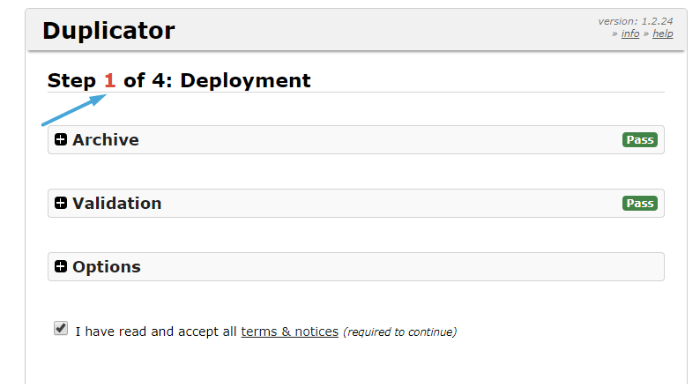
Then you can go to yourdomain.com/installer.php and follow the plugin’s four-step wizard to restore your site. The only slightly technical thing that you’ll need to do is create an empty database for Duplicator to connect to (here’s how to do that in cPanel, the most common hosting management tool):

Duplicator - restore site

#5: BackUpWordPress


BackUpWordPress is a backup plugin from Human Made, one of the largest WordPress development agencies. In addition to working with enterprise clients like USA Today, they’ve also created some of their own products like BackUpWordPress.

With BackUpWordPress, you can:

  • Take complete site backups or database backups
  • Create separate schedules for complete backups and database backups

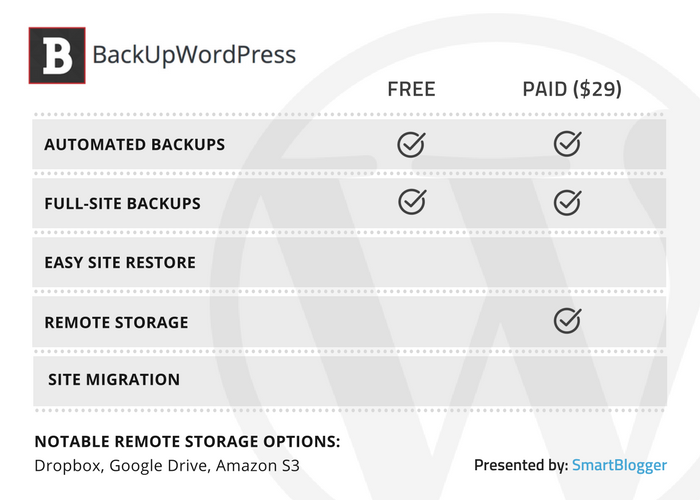
If you upgrade to the Pro version starting at $29, you’ll also get the ability to back up to off-site storage like Google Drive, DropBox, Amazon S3 and more.

BackUpWordPress - table

Who Is BackUpWordPress Good For?

BackUpWordPress is a great option for casual users who want something that works out of the box. There’s literally nothing you need to configure — just activate and go.

On the other hand, it doesn’t currently offer a dedicated restore function. That means the simplicity only extends to actually backing up your site, not restoring it.

Also, in the free version, you don’t get remote storage, so you have to manually download your backups on a regular basis.

How to Take a Backup with BackUpWordPress

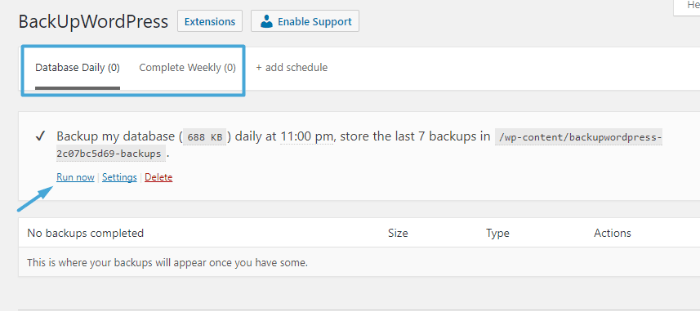
As I mentioned, you don’t actually need to do anything after activating the plugin. By default, BackUpWordPress starts off with backups already scheduled.

It will:

  • Back up your database every day
  • Back up your entire site every week

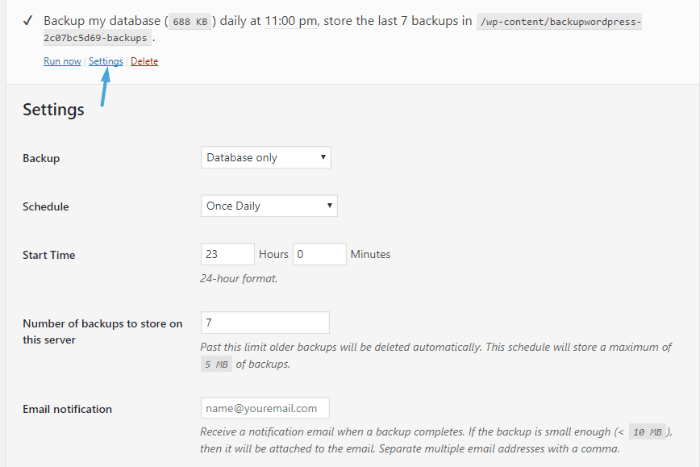
If you want, you can always manually create a backup by clicking Run now:

BackUpWordPress - manually create database

And you can also change the default schedule by clicking on Settings:

BackUpWordPress - change default schedule

In the free version, you’ll then need to manually download your backups to your local computer in order to ensure that you always have a working copy available. While the plugin will store backups on your server (according to your settings), this is not a safe way to store your backups long-term because if something happens to your server, you’ll be unable to access your backups.

How to Restore Your Site from Backup with BackUpWordPress

Again, BackUpWordPress does not have a dedicated restore function. To restore your site from backup, you’ll need to upload all of the files via FTP and import your database via phpMyAdmin.

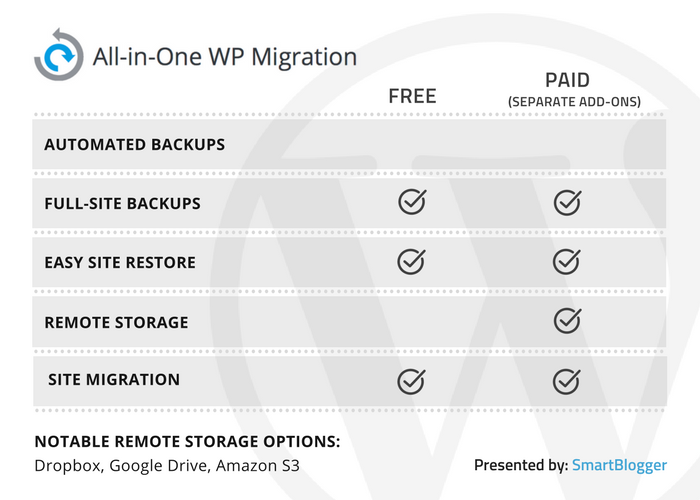
#6: All-in-One WP Migration


Like Duplicator, All-in-One WP Migration is a migration plugin that serves double duty as a backup plugin. One thing that’s nice about All-in-One WP Migration, though, is that it offers a simpler restore process than Duplicator.

The plugin gives you:

  • Full or partial backups
  • Easy restore from backup
  • Functionalities that make migrating your site a breeze

You can also purchase individual premium extensions for off-site backups at cloud storage providers like Google Drive, Dropbox, OneDrive, and more.

There’s no way to put your backups on an automatic schedule, though.

All-in-One WP Migration - table

Who Is All-in-One WP Migration Good For?

Because it lacks scheduled backups, All-in-One WP Migration is good for users who are willing (or even prefer) to handle things manually.

One advantage that All-in-One WP Migration has over some of the other backup plugins is that it gives you a good deal of control over which files you export, which is helpful if you only want to take partial backups.

Most of the time, you’ll probably want to take full backups anyway, so this isn’t a huge advantage for casual users. But partial backups can be helpful if you’re running an especially large site where taking a full backup every day takes up too much space and/or processing power.

For example, if you use tons of high-resolution images that don’t change very often, it’s a waste of resources to back up those files every single time you take a backup.

For most casual users, one of the plugins that focuses specifically on backups will offer a more streamlined solution.

How to Take a Backup with All-in-One WP Migration

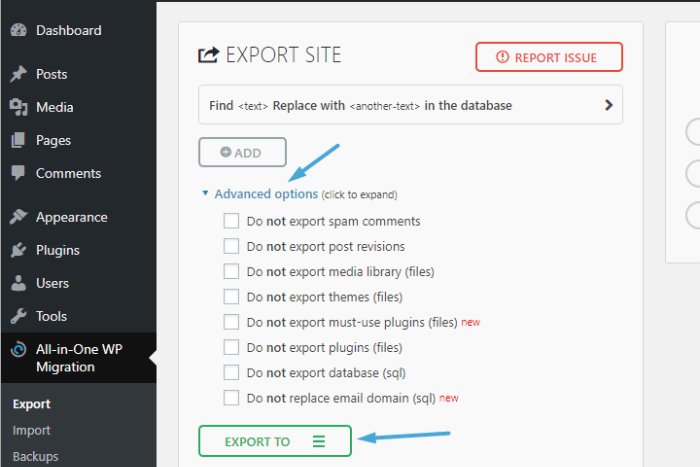
To create a backup of your site, you need to Export it. You can export your entire site or exclude certain elements by using the Advanced options:

All-in-One WP Migration - create backup

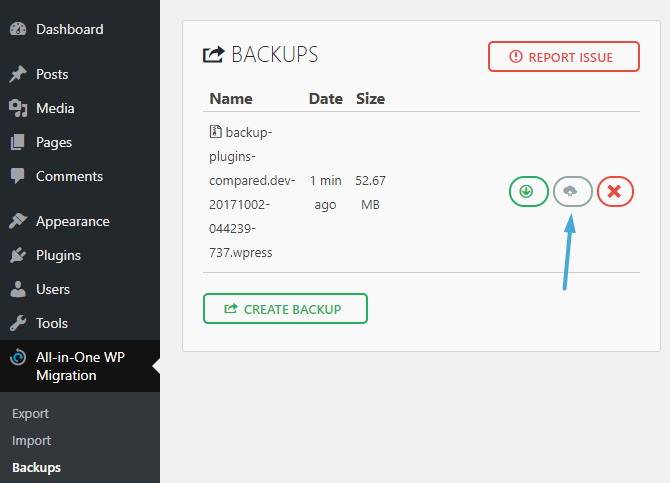
Once you export your site, the plugin will prompt you to save the file to your computer (or your offsite location if you purchase a premium extension). And the files will also show up in the Backups tab of the plugin.

How to Restore Your Site from Backup with All-in-One WP Migration

To restore your site from a backup, you have two options.

First, you can go to the Backups tab and click the restore button:

All-in-One WP Migration - restore

Second, you can go to the Import tab and upload a previously exported file from your computer or a remote storage location:

All-in-One WP Migration - import
Note: One well-known plugin that’s missing from this list is BackupBuddy. We intended to include it, but unfortunately iThemes does not offer a trial version, maintains a strict no-refund policy and did not respond to any of our requests for a demo licence. 🙁
 

Start Taking Backups and Sleep Easy Knowing That Your Site is Protected

Peace of mind is a beautiful thing.

And after you start using one of these WordPress backup plugins, that’s exactly what you’ll have.

Don’t wait — choose the plugin you like the best, install it, and create your first backup.

Then, no matter what happens to your site, you’ll always have a working copy tucked safely away.

And that means you can sleep easy knowing the work you’ve put into your site is safe and secure.

Author bio: Colin Newcomer is a freelance writer for hire with a background in SEO and affiliate marketing. He helps clients grow their web visibility by writing primarily about digital marketing and WordPress. In his spare time, he travels and curates graphic t-shirts.
 

from
https://smartblogger.com/wordpress-backup-plugin/
Wednesday, November 15, 2017

Confession: I Don’t REALLY Care About Blogging

Yes, you read that correctly. I don't really care about Blogging.

I know what you're thinking. This blog is called Become a Blogger. I HAVE TO care about blogging.

If that's what you're thinking, don't worry – I understand. But I'm going to encourage you to listen to today's episode.

Listen to This Episode

In the episode, I get kinda personal and share the journey I've been on for the last few weeks.

There are certain things changing in my life, and I'm happy to share a little bit of my story with you.

This is not one of my typical episodes, but I hope you get a different kind of value from it.

Enjoy!

– Leslie

Here's the video I referred to in the episode:

The post Confession: I Don’t REALLY Care About Blogging appeared first on Become A Blogger by Noemi M.


from
https://www.becomeablogger.com/25624/dont-care-blogging/

Thursday, November 9, 2017

A Simple Strategy That Got This Blogger 3.6 Million Facebook Likes

When Jon Morrow launched his new personal development blog, Unstoppable.me, at the end of 2016 he reached out to a few successful bloggers to share his first post.

Jon credits Steven Aitchison’s Facebook fans for the massive amount of clicks and shares that put that first post over the viral edge — 16,000 in three days.  

“Without question, Steven is a Facebook master,” Jon said.

“Steven shared the post on his Facebook page twice, and both times Unstoppable got a massive boost in clicks and shares. His Facebook community really helped the post go viral.”

Unfortunately, few bloggers recognize and cultivate the hidden power and reach of a popular Facebook page and active community like the one Steven has built. Instead they blindly accept and follow misguided myths perpetuated by those who haven’t taken the time to study how Facebook works.

From Humble Beginnings Grew a Powerhouse

Steven admits he certainly didn’t pay much attention to Facebook during the first few years of his blog, Change Your Thoughts, Change Your Life, that he started in August 2006. After getting good feedback from readers, he started to get more serious about turning the blog into a business in 2009, when he had about 2,000 email subscribers.  

By the time he quit his job as an addiction counselor in September 2012 to devote himself to blogging, his email list had grown to 10,000 subscribers, but he says his Facebook presence was “kind of non-existent.”

“I had maybe 30,000 likes from slow, incremental growth from posting to Facebook from my blog, typical of most bloggers,” Steven said. “I literally wasn’t doing anything.” He made $36,000 the following year from full-time blogging, more than he had made up to this point but not enough to support his family.

Then Steven began focusing on and experimenting with Facebook. And everything changed.

10X Business Growth from Facebook

Fast forward to 2017.

Steven transformed his blog and Facebook page in the last five years from an average page he described as “going nowhere” to the moneymaker it is today with more than 3.6 million likes and more than 3.6 million uber-engaged fans.

Steven Aitchison’s Facebook Likes

His email list is a healthy 71,000 subscribers. His business grossed $360,000 in 2016 and is on track for a substantial boost in 2017.

The One Question That Transformed Aitchison’s Facebook Page

Steven credits one fundamental shift in his thinking and attitude for his Facebook page’s transformation from okay to extraordinary.

“I had been asking myself, ‘How do I make more money?’” Steven said. “Then I started asking myself ‘How can I help more people?’” Without realizing it, that simple, six-word question launched his evolution from a money-centered entrepreneur to a heart-centered entrepreneur, and with it, his financial future.

“You’ve got to think about the viewer first, and you’ve got to think about what is going to touch somebody’s heart, what’s going to give them an emotional response,” Steven explained. “If you can, think about it from that point of view. Always think about the customer first. It’s not about what you want.”

That unassuming question is the catalyst behind all of Steven’s growth over the last five years. His financial success is proof that persistence, experimentation and smart marketing can combine with a generous heart and people-first approach to build a business.

“By asking that one question,” Steven said, “I think that alone keeps you grounded because you’re always thinking about the readers, not always thinking about you, the business and the money. I really found my purpose when I started asking that question.”

After realizing that putting people first enriched — not diminished — his bottom line, Steven’s naturally curious mind began questioning other common myths about making money online and on Facebook.

The One Question That Transformed Aitchison’s Facebook Page

The Two Misguided Myths That Keep Facebook Pages Stuck in Mediocrity

Steven’s popular and profitable Facebook page busts the two prevalent myths about making money on Facebook, and it’s a key element of what he shares with the community of bloggers in his membership course, Your Digital Formula.

Myth #1: You Can’t Make Money on Facebook


This myth is rooted in the mistaken belief that the feel-good focus popular on Facebook can’t be used as a monetary tool.

Steven’s Facebook page is unapologetically feel-good. He loads it with self-styled encouraging and inspirational quotes and videos (more on this tactic later). His success proves that this approach can be profitable.

From its meager beginning of $36,000 in 2012, Steven’s business grossed $360,000 in 2016, and he attributes $200,000 of the revenue to Google AdSense from the massive traffic driven by Facebook to his blog.  As his Facebook likes and followers grow, so does his Facebook-driven income stream.

Note: Steven makes a lot of revenue from Google Adsense, but we still don’t recommend you use ads to build your blogging income. It works for him because of his insanely high-traffic site. You’ll take a long time to earn that kind of revenue.
 

Myth #2: You Have to Advertise on Facebook to Make Money


In his determination to master Facebook, Steven tested and wasted $50,000 on paid Facebook advertising before he knew what he was doing with no profit to show for it.

“The myth is that you have to advertise to make any money on Facebook, and you don’t. You absolutely don’t. It takes a wee bit longer, but you can totally do it all organically,” Steven said. “I built up the Facebook page organically.”

The danger of this myth is compounded by the faulty notion that emotion has no value or currency. Steven believes touching hearts is a powerful advertising message that can have viral legs.

The point where everything changed was when he realized he could rely on connection and emotion to drive his business, instead of focusing solely on  money.

Myth No. 2: You Have to Advertise on Facebook to Make Money

The 6 Big Mistakes That Doom Facebook Pages

Central to Steven’s powerful Facebook strategy is studying and modeling what works. He’s seen six big mistakes repeated over and over, one of which can doom even well-organized Facebook campaigns.

Mistake #1: Posting Only What You Like Without Considering Whether it Touches or Helps People


Because all kinds of content goes viral on Facebook at one time or another, many people assume that any clever thought they have is fair game to go viral. Yet nothing could be further from the truth, Steven says. If you truly want to grow a massive following on your Facebook page, you have to focus on content that touches hearts and helps people.

Stop and ask yourself if the image, quote, blog post or video really connected with you, really touched your heart, he advises. Get beyond your own personal likes, biases and preferences and down to the emotional value of the content. If you find yourself in resistance saying, “But I really like it!” you may not be focused closely enough on your readers.

Mistake No. 1: Posting Only What You Like Without Considering Whether it Touches or Helps People

Mistake #2: Assuming Your Followers Will Like Anything You Post Because You’re You


This second mistake is a deeper version of the first mistake, which assumes that your followers will like anything you post just because you posted it. It’s actually quite easy to correct these two mistakes with one blow: Think about your audience first. Post helpful, touching content they have demonstrated they like, Steven advises.

”I think Facebook page owners are always thinking they can put anything up because they’ve got a million followers and their followers are going to like everything. I think that’s one of the big mistakes, thinking anything you put up is going to be okay for them, whether it be a blog post, a video or an image quote.

“You’ve got to be thinking and asking the questions, ‘Okay, does this entertain somebody? Does it enlighten somebody, or does it educate them in some way?’ If you ask yourself those questions, then I think you can’t really go far wrong depending on the page type and niche.”

Mistake #3: Giving Everything You Post on Facebook Equal Treatment


Let’s face it: Some content will be more popular on Facebook. Millions of dollars are spent trying to figure out that magic formula, but Steven has learned — and leverages — a simple Facebook truth: People share content that touches their emotions.

“Facebook page owners will drag out posts, posts that are good, posts that are bad,” Steven said. “If you put a lot of bad blog posts up — bad as in people are not going to interact with the content and it’s not creating that connection for some reason — those posts are not going to give you a lot of reach because the only way you’re going to get traffic from Facebook is if you create that engagement, and part of that engagement is commenting, liking and sharing.”

If you share your blog post on Facebook, and people comment, like and share from the outset, then that blog post is going to do well, and you will get a lot of traffic. You should give that post more Facebook love than the ones that get no reaction. (More on this later.)

Mistake #4: Fear of Testing, Fear of Touching People


The most effective way to determine the best type of content for your audience is to test different types and record the response, yet people hesitate and procrastinate because of two very human fears — looking stupid and feeling vulnerable.

Steven said one of the most dramatic changes he made with his Facebook page was to be in constant testing mode, trying out varied types of content — different styles and images for quotes, different types of videos, along with different types of questions inviting responses.

Once he let go of those fears and intentionally reached out to touch people’s emotions, Steven said the viral doors opened almost spontaneously.

“A lot of people are afraid to put up a test. This is all I do. I just kind of test,” he explained. “I say that to all the students as well: ‘You have to test.’

“They ask me, ‘Do you think this will work?’ I say, ‘I don’t know, test it. Just test it and see what happens.’ A lot of people are afraid to do that, to try something new.”

Mistake No. 4: Fear of Testing, Fear of Touching People

Mistake #5: Thinking Facebook Is Neutral to the Type of Content You Post


This fourth mistake (a corollary to the previous one) is thinking Facebook has no preferences about the type of content posted. Au contraire!

Right now Facebook is quite partial to video content because it has a stated goal of overtaking YouTube within a year, Steven said. That means videos of any kind are given preferential exposure and automatically ranked higher than standard text posts.

Notice more video in your feed? That’s why, and it’s only going to get more intense.

Mistake #6: Ignoring Other Facebook Pages in Your Space


Rather than treat other Facebook pages as competitors, Steven treats them as collaborators and strategically shares their content with his blog readers and Facebook followers.

Collaborate not compete

He developed a nifty tactic of writing blog posts that highlight specific genres of Facebook pages and their Facebook headers, such as “25 of the Top Consciousness Raising Facebook Pages,” then sharing them with the Facebook pages he featured in the blog post.

The showcased Facebook page owners almost always reciprocate by sharing the post on their own pages, sending more visitors to Steven’s Facebook page and creating a win-win situation for everyone, Steven said. He also watches the most popular pages in his niche to see what they’re doing and what he might try.

Steven’s well-honed strategy combines both a heart-focused attitude and savvy marketing tactics.

8 Steps to Attracting Millions of Facebook Fans

Step #1: Shift Your Focus from Making Money to Helping People


Make that fundamental shift and everything else aligns with it.

Since first asking himself that question back in 2012, helping more people has driven every question Steven asks about his strategy, tactics, products and content creation.

”Think about the kind of people on your page, what their main pain points are and what other issues they’re having,” Steven said. “If you can touch somebody’s heart, then it speaks to them and you’ve got the potential to go viral.”

Step #2: Know Your Audience Better Than You Know Yourself


Most Facebook page owners don’t really know the demographics and psychographics of their readers and, as a result, don’t know who they are talking to. Yet Facebook gives in-depth data on your audience and their preferences within your Insights page. Aitchison’s readership is about 76% women aged between 25 and 54.

“When I am writing or doing video and putting blog posts up, I always have them in mind,” he said. “You can’t put up blog posts about how fantastic men are. You can, obviously, but it’s not going to do as well as if you have a different type of blog post about how fantastic women are, for a silly example.”

Step #3: Don’t Stop at Posting Heartfelt Content — Interact with Your Readers


Steven intuitively follows a two-part content-creation sequence: establishing an emotional connection with readers with content that touches his own heart, and interacting with followers directly.

He makes sure the quotes and images he posts are heartfelt by asking himself if they touch his own emotions and connect with his readers on a deep emotional level. He follows through by being accessible and responding to readers directly. It’s this last step Aitchison feels is the critical piece of the puzzle that most bloggers ignore.

“I think what’s made the page explode is that I’ve really interacted,” Steven said. “Most page owners, when they do Facebook, they put some post up, they put many posts up, but they’re not really connecting with the readers.”

“Readers come back for more when they know they’ve got access to the Facebook page owner, who’ll respond to comments when you’re on Facebook Live, or shout out their name or respond to messages,” he said. He only got someone to help behind the scenes with automatic responses earlier this year.

He believes it’s about creating something readers can belong to and connecting with them with your posts, quotes and videos. “It’s about connecting to something and to somebody as well,” Steven said.

Don’t Stop at Posting Heartfelt Content — Interact with Your Readers

Step #4: Write Your Own “Aha” Quotes that Touch People


Aitchison is a firm believer that quotes can deliver “Aha!” moments that readers remember. When he started actively working his Facebook page, Steven was using quotes from other writers for his image quotes, just like everyone else.

Then he realized he was giving away free marketing, often to dead people, when he himself had written millions of words. So he began to rewrite the thoughts and concepts in his own words, putting his name below the quote. His online and Facebook recognition accelerated from 20 people finding his blog every month by Googling his name to 1,200 people.

Forgiving - Aha Quote

“It first started when I was doing the image quotes. Then it kind of transferred over onto video and now onto the live shows as well,” he said. This tactic is an easy and obvious way of becoming your own brand that leads directly to more traffic, more likes and, eventually, more income.

Step #5: Create Video That Touches People


Aitchison’s entry into video was pure experimentation that triggered a social media epiphany.

He was in his hotel room one night while at a conference in San Diego in 2016 when he decided to try Facebook Live, which had been recently introduced.

“I thought, I’m going to try this and see what happens. I didn’t have anything planned to say or anything. Just went on and just said, ‘Hi, Steven Aitchison here doing a Change Your Thoughts page.’ Then before I knew it there were about 10,000 people on at one time. I’m going, ‘Holy sh–. What’s going on?’”

By the time Steven had finished his first short video, it had about 50,000 total views. He realized there was a huge opportunity to interact with his millions of followers and immediately launched a daily Facebook Live show.

He mixes up his content by playing off his blog posts while talking with readers, doing interviews with people popular in the self-development niche, hosting live and guided meditations and sharing other personal development videos with commentary.

He urges bloggers to face the fear and do it anyway.

“Tech things can happen, but there have been no really awkward moments.”

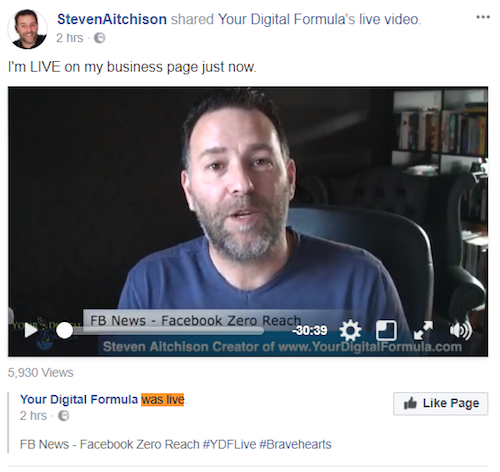
10 Things to drop from your life right now.

10 Things to drop from your life right now…<3

Posted by StevenAitchison on Monday, November 6, 2017

Step #6: Study Your Posts’ Performance and Promote the Winners


Here’s a statistic that shocks most Facebook page owners, who think 100% of their followers see everything they post. In reality, only about 6% of your Facebook page followers will be shown a post when you first post it, as Facebook tests its popularity.

If your post is shared and commented upon — becoming more popular — Facebook will show your post to more of your followers, but not until it’s sure the post is popular enough according to its algorithm. Popularity breeds popularity in the Facebook algorithm. If your post sits around and does nothing at first, Facebook won’t show it to more of your followers.

Pay attention to the organic winners, give them a boost and let them run, Steven advises. Ignore the losers, which will drag down the overall ranking of your page. Learn from both the winners and the losers, and model the winners.

That’s difficult for most bloggers who believe the problem is that not enough people have seen the post, not that it doesn’t touch people.

Steven tracks the popularity of all of his Facebook posts and reposts the most popular content — the posts that rank higher than his average ranking — every three to four weeks. When the reach and engagement of those popular posts drops below average, he retires them for a few weeks or months, then starts reposting them again since his page will have a new set of followers who haven’t seen that post yet.

He credits this one technique — reposting the winners — with dramatically growing his Facebook page, as repostings often did better than the first posting.  

Step #7: Pay Attention to Facebook’s Next Moves


Steven always has one eye on what Facebook is pushing and will shift gears at a moment’s notice.

“You have to experiment and look out for what Facebook is pushing,” he advised. “I call it the Facebook stack. The Facebook stack is really all about checking out what Facebook is really pushing just now, and right now, for example, it’s videos. It’s Facebook Live just now and their own creation, which is Facebook Slideshow. They’re going to give it more reach because Facebook is promoting that automatically.”

Pay attention to Facebook's moves.

Rather than turn a blind eye to the advertising on Facebook, Steven recommends paying attention to what Facebook itself is advertising — a hidden-in-plain-sight clue to what Facebook is pushing at the moment. And be ready to act.

“You have to jump on the bandwagon,” Steven said. “You have to be on the ball and look out for what Facebook is promoting. You have to jump on it. People kind of get stuck thinking Facebook is going to stay the same and you can put the same old kind of blog posts up, and they don’t realize Facebook is changing almost every day.”

Step #8: Always Be Human and Genuine


Despite millions of followers and Facebook Likes, Aitchison said because of the type of person he is, his head is never in the clouds.

“I always question myself, I always question what I’m doing and I always ask the question, ‘How can I help more people?’” If you ask that one question in every area of your business you’ll quickly feel the disconnection when you don’t ask it, Steven said.

“The biggest compliment I keep getting is, ‘You’re really genuine, you’re really authentic,’ and I think that just being yourself really comes across.”

Lessons Learned: What Steven Would Do if He Had to Start Over

Steven was quick to list the things he would do differently if he had to start his blog and business over today.

Actively build my email list from Day 1.

Steven didn’t focus on building his list actively from the start, letting the list grow slowly and organically. Later, when he saw the direct correlation between how increased traffic on Facebook sent to an opt-in page exploded his email list and business, he realized the late start had held him back.

Understand that it is the interplay of your blog, email list and Facebook where you make money

Steven approached these elements in sequence, focusing first on his blog, then email list growth, then Facebook page growth. It wasn’t until he integrated these three key elements that his business growth took off. All three would be integrated immediately if he had to do it over.

Connect with people and collaborate sooner

Steven said he was like many bloggers, doing his own thing as a lone wolf for the first six to seven years. Not only did that mean he learned some things more slowly as he struggled, it meant he didn’t have the advantages of a network that would support and help him.

Understand the focus is on how many people I can connect with and help, not only on making money

Without the focus on helping people, Aitchison believes even a masterful execution of the first three lessons will result in mediocre success.

More Growth Means More People to Connect With and Touch

Steven doesn’t expect that his Facebook page will look the same in a year or two. Nor will his blog or business, except that he’ll be connecting with more people and touching more hearts. He understands that change is the only constant, and he fully intends to roll with Facebook’s direction.

He anticipates his page will evolve as livestreaming becomes more of a focus on Facebook, likely requiring him to upgrade the quality of his live shows to more TV-like quality, in effect creating mini TV shows.

“I think it’s going to be about me getting in front of the camera more,” Steven predicted. “Not something I’m naturally inclined to do, but this is why I’ve been doing Facebook Live for some time now — to get out there, to connect even more with the audience. I see it growing bigger, obviously, along with the challenges.”

He relishes the challenges because they keep him connected to the readers, and it’s that connection that keeps him going.

“I’ll never get big-headed or conceited because I always bring myself back to earth as quickly as I put my head in the clouds,” Steven said. “It’s a nice feeling when people come to you and say, ‘You really changed my life.’

“And I keep on asking the question, ’That’s nice, but the balance is, how can I help more people?’”

Author Bio: Marsha Stopa is senior instructor and coach for all Smart Blogger courses. She’s living her dream in the Blue Ridge Mountains in western North Carolina, where she just bought a fixer-upper among the bears on a quiet mountain with a stunning view.
 

from
https://smartblogger.com/facebook-likes/

Wednesday, November 8, 2017

What We Took Away from Success Incubator and FinCon – with Serena Appiah

Don’t you wish you were at FinCon with me?

In this episode, I’m coming to you live from Dallas, TX, where I’m attending FinCon 2017! With me is Serena Appiah of ThriftDiving.com, who is joining me for a fourth time on the podcast.

We’re here to share the action steps that we have gained from this conference and we’re planning to implement in our own businesses with you! It’s almost like actually being here…almost.

Intro


Listen to This Episode

This year is Serena’s second time at FinCon, and she says it’s just as amazing as last year. I always say that the best learning is what happens outside of the sessions, and Serena is finding that to be true. You get so many tips and tricks to take back to your business just from people you’re having conversations with in the hallways, during the coffee breaks, or at lunch.

By the way, we went to The Clutch for lunch. It was my first time ever eating bacon. That wrap was SO good!

Serena’s #1 Tip

Which Path?

Serena’s top tip comes from the keynote by Darren Rowse of problogger.com. He spoke about knowing who your audience is.

Sure, we hear this all the time, but Darren said something really new and really profound.

He said that once you know your audience and you know what their struggle is, you then have to figure out where you want to take them. It’s not enough to think about where they are right now. You have to imagine where they’re going to be.

The first step is to figure out who the person is. Draft an avatar and ask: what is their pain? What is their problem?

Once you, as a blogger, transform that person, how does the avatar change? What do you want them to look like after?

Actually draft your “before” and “after” avatars. Who will your audience become as they engage with you?

What’s extra cool is once you do that work, you will have a clear vision about what you should and should not take on. So if someone approaches you to promote a product, think about your avatars and remain true to them. If something isn’t the right fit, even if it’s a lucrative opportunity, turn it down. Stay true to your audience.

Leslie’s #1 Tip

My number one tip actually comes from Success Incubator, which took place before FinCon. The tip is about your homepage:

Instead of having your homepage focused on who you are, have it focused on who your audience is and what value you’re going to provide to them.

When I come to your blog, quite frankly, I don’t really care about you. Your audience isn’t worried about who you are — they’re looking for what this blog can do for them.

Take a look at your homepage and think about whether you’re really demonstrating what the value of your blog is to someone who is visiting for the first time.

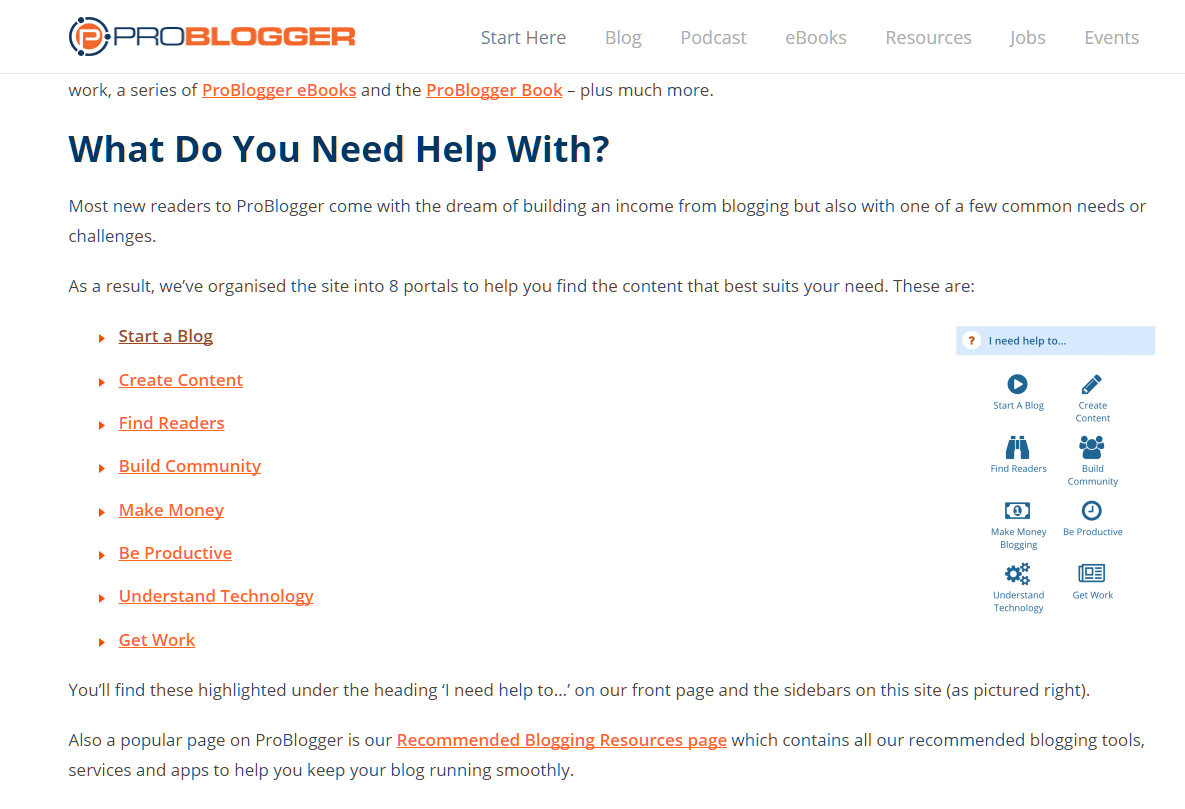
Darren Rowse actually lists the problems he’s trying to solve on the homepage. He identifies the problems and gives people one-click solutions. If you scroll down on his homepage, you’ll see a section titled “I Need Help To…” followed by a series of problem areas: grow content, build a community, make money, and so on.

Darren Rowse Problogger Homepage

Darren Rowse identifies the problems and gives people one-click solutions on his Homepage.

His site is like a roadmap. It says, “Click here to see how you can solve your problem.” And that makes it really easy for visitors to find what they need.

More Tips

Call audience

Call your audience on the phone

Another tip Serena is going to take home is the idea of calling readers on the phone. Pat Flynn calls about ten of his readers every month. A real phone call makes people feel so special and helps you really build a relationship with them.

Plus, the amount of information you get from a phone call is really different from a survey. For example, in Serena’s niche, people often say that they don’t do DIY because they don’t have enough time. But when she talks to people, she finds that a lot of people are actually lacking in confidence rather than time, and that’s a separate problem.

I loved this tip from Steve Chou’s session. So, he has a lead magnet, and people opt in when they come to his page.

The great part is that Steve tries at that point to get them to evangelize. His thank you page tells the visitor that if they click and share the content on Facebook, they’ll get an additional free resource. You get something extra when you share the content. How smart is that?

Steve Chou allows his audience to access more content if they click and share his other content and infos.

But how do you know that someone has shared? Steve coded his himself, but Thrive Themes has an option for this. There are also a number of plugins that will allow you to unlock content automatically if your audience shares content in a particular way.

This is a great way to leverage your thank you page and grow your list even more.

Serena is also planning to go home and ask herself, “What are your money blocks?” She picked this one up at the Internet Marketing Party, an independent get together here in Dallas.

She was talking to Denise Duffield-Thomas, author of Lucky B*tch. Denise always asks, “why are you not earning the money that you deserve? Why are you not getting more passive income?” Those are your money blocks.

One of Serena’s blocks is that she’s afraid people aren’t going to take her seriously or think she’s worthy of paying for her skills. We tell ourselves that earning good money means we should be working hard, and if we’re not working hard we feel like we don’t deserve it.

Have a tough conversation with yourself. What is holding you back? What are your money blocks?

Drip Email Marketing

Drip Email Marketing

Kim Sorgius hooked me up with a much more advanced trick. Depending on which email marketing service you’re using, you may not be able to do this, but I really recommend trying it if you can!

Say you have an email list of 1000 people, and you send an email to all of them. If 200 people open that email, you have a 20% open rate. So Kim uses Drip lead scoring to be able to determine who is always opening her emails. She can actually tell which email addresses belong to her most engaged list members.

But wait! It gets better! Once Kim determines who really engages with the content, she will automatically set Drip to email those people first. That first email gets a 90% open rate, or even higher.

Then, half an hour or 40 minutes later, she sends the same exact email to everyone else.

Why? By sending to your hot leads first and getting that high open rate, the email servers see your email as a high-quality message. They’ll then prioritize that email when you send the second set, which makes it more likely to land in priority inboxes.

Kim currently has 100,000 subscribers. When she started doing this, she was getting about 30,000 opens per message. But her open rate has increased significantly over the time that she has been using this trick. This then puts more and more people on the hot engagement list, which makes the tip work even better!

Even More Tips

One more thing that I am re-learning at this year’s FinCon is the importance of keeping your thumb on the pulse, riding the waves, and getting in on the trends.

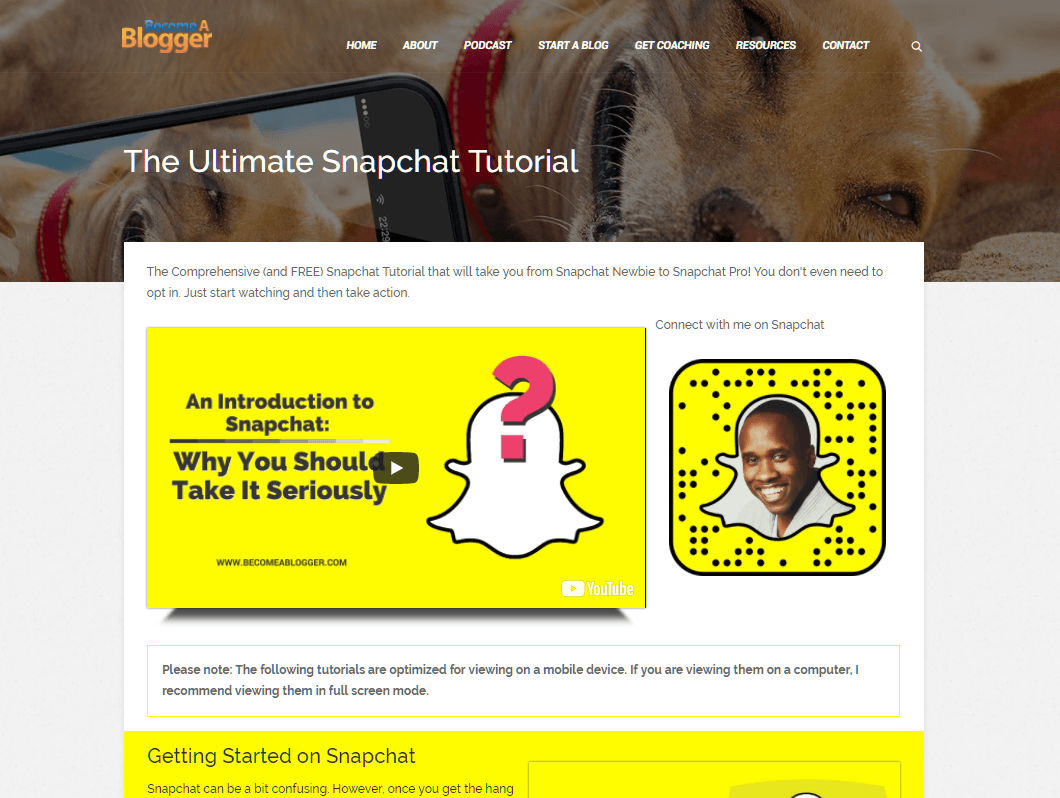
For example, a couple years ago when Snapchat was first on the scene, I made a comprehensive Snapchat tutorial to help people get started on that platform. It was super popular and really successful because people were already searching for help with Snapchat.

Snapchat

The Ultimate Snapchat Tutorial

Keeping on top of trending topics gives you an extra boost.

How do you find these trending topics? Know your industry, and follow news sites that are important for your industry. Another great tactic is to go to conferences! There are often new products being previewed or launched that aren’t yet available to the general public.

Serena recommends going to any conferences in your niche. You don’t have to restrict yourself to blogging conferences!

Another great tip, even though I can’t remember who this one is from: look in Google Analytics and determine your top five posts.

Optimize

Optimize your top posts.

Then — and this is the important part — spend one day on each of those posts and optimize the bejeezus out of it.

  • Optimize the images.
  • Make the SEO perfect.
  • Update it to add more resources.
  • Add a lead magnet.
  • Put in some affiliate links.
  • Create a pdf version, or a checklist or infographic version that they can download and take away.

Final Tip

Serena and Leslie at FinCon 2017If you’re listening to this podcast right now, Serena and I want you to pick one of these tips and make it a goal.

Over the next days, or weeks, or months, do this one thing to help move the needle on your business just a little bit. Make this happen!

If you’re passionate about what you’re doing, you’re going to be successful.

You can learn more about what Serena is up to over at ThriftDiving.com and on all the social media platforms @ThriftDiving!

Resources Mentioned

The post What We Took Away from Success Incubator and FinCon – with Serena Appiah appeared first on Become A Blogger by Noemi M.


from
https://www.becomeablogger.com/25606/success-incubator-fincon/